Usando a segurança com WebAuthn
experimentalEste guia demonstra como seu aplicativo Quarkus pode usar a autenticação WebAuthn em vez de senhas.
|
Essa tecnologia é considerada experimental. In experimental mode, early feedback is requested to mature the idea. There is no guarantee of stability nor long term presence in the platform until the solution matures. Feedback is welcome on our mailing list or as issues in our GitHub issue tracker. Para obter uma lista completa de possíveis status, consulte nosso FAQ. |
Pré-requisitos
Para concluir este guia, você precisa:
-
Cerca de 15 minutos
-
Um IDE
-
JDK 17+ instalado com
JAVA_HOMEconfigurado corretamente -
Apache Maven 3.9.16
-
Opcionalmente, o Quarkus CLI se você quiser usá-lo
-
Opcionalmente, Mandrel ou GraalVM instalado e configurado apropriadamente se você quiser criar um executável nativo (ou Docker se você usar uma compilação de contêiner nativo)
-
A WebAuthn or PassKeys-capable device, or an emulator of those.
Introduction to WebAuthn
WebAuthn is an authentication mechanism designed to replace passwords. In short, every time you write a service for registering new users, or logging them in, instead of asking for a password, you use WebAuthn, which will replace the password.
WebAuthn replaces the password with a proof of identity. In practice, users, instead of having to invent a password, store it or remember it, will use a hardware token that will generate a proof of identity specifically for your service or website. This can be done by asking users to press their thumb on their phone, or pressing a button on a YubiKey on a computer.
So, when you register your user, you use your browser to enter your user information (username, your name, etc…) and instead of typing a password to identify yourself, you click a button which will invoke the WebAuthn browser API which will ask you to do something (press a button, use your fingerprint). Then, your browser will generate a proof of identity which you can send to your service instead of a password.
This proof of identity, when you register, consists mostly in a public key. Actually there’s a lot of stuff in there but the most interesting is the public key. This public key is not stored on your device, or your browser. It is generated especially for the target service (tied to its URI), and derived from the hardware authenticator. So the association of the hardware authenticator and the target service will always derive the same private and public key pair, none of which are stored anywhere. You can for example, take your YubiKey to another computer and it will keep generating the same private/public keys for the same target service.
So, when you register, you send (mostly) a public key instead of a password, and the service stores that information as WebAuthn credentials for your new user account, and this is what will identify you later.
Then, when you need to log in to that service, instead of typing your password (which doesn’t exist, remember?), you press a button on the login form, and the browser will ask you to do something, and then it will send a signature to your service instead of a password. That signature requires the private key that is derived from your authenticator hardware and the target service, and so when your service receives it, it can verify that it corresponds to the signature of the public key you stored as credentials.
So, to recap: registration sends a generated public key instead of a password, and login sends a signature for that public key, allowing you to verify that the user is who they were when they registered.
In practice, it’s a little more complex, because there needs to be a handshake with the server before you can use the hardware authenticator (ask for a challenge and other things), so there are always two calls to your service: one before login or registration, before calling the hardware authenticator, and then the normal login or registration.
And also there are a lot more fields to store than just a public key, but we will help you with that.
Just in case you get there wondering what’s the relation with PassKeys and whether we support it: sure, yes, PassKeys is a way that your authenticator devices can share and sync their credentials, which you can then use with our WebAuthn authentication.
The WebAuthn specification requires HTTPS to be used for communication with the server, though
some browsers allow localhost. If you must use HTTPS in dev mode, you can always use the
quarkus-ngrok extension.
|
Arquitetura
In this example, we build a very simple microservice which offers four endpoints:
-
/api/public -
/api/public/me -
/api/users/me -
/api/admin
The /api/public endpoint can be accessed anonymously.
The /api/public/me endpoint can be accessed anonymously and returns the current username if there is one, or <not logged in> if not.
The /api/admin endpoint is protected with RBAC (Role-Based Access Control) where only users granted with the admin role can access. At this endpoint, we use the @RolesAllowed annotation to declaratively enforce the access constraint.
The /api/users/me endpoint is also protected with RBAC (Role-Based Access Control) where only users granted with the user role can access. As a response, it returns a JSON document with details about the user.
Solução
Recomendamos que siga as instruções nas seções seguintes e crie a aplicação passo a passo. No entanto, você pode ir diretamente para o exemplo completo.
Clone o repositório Git: git clone https://github.com/quarkusio/quarkus-quickstarts.git, ou baixe um arquivo.
The solution is located in the security-webauthn-quickstart directory.
Criando o projeto Maven
Primeiro, precisamos de um novo projeto. Crie um novo projeto com o seguinte comando:
Para usuários do Windows:
-
Se estiver usando cmd, (não use barra invertida '\' e coloque tudo na mesma linha)
-
Se estiver usando o Powershell, envolva os parâmetros '-D' entre aspas duplas, por exemplo, '"-DprojectArtifactId=security-webauthn-quickstart"'
|
Don’t forget to add the database connector library of choice. Here we are using PostgreSQL as identity store. |
This command generates a Maven project, importing the security-webauthn extension
which allows you to use WebAuthn to authenticate users.
If you already have your Quarkus project configured, you can add the security-webauthn extension
to your project by running the following command in your project base directory:
quarkus extension add security-webauthn./mvnw quarkus:add-extension -Dextensions='security-webauthn'./gradlew addExtension --extensions='security-webauthn'Isto irá adicionar o seguinte trecho no seu arquivo de build:
<dependency>
    <groupId>io.quarkus</groupId>
    <artifactId>quarkus-security-webauthn</artifactId>
</dependency>implementation("io.quarkus:quarkus-security-webauthn")Escrevendo o aplicativo
Let’s start by implementing the /api/public endpoint. As you can see from the source code below, it is just a regular Jakarta REST resource:
package org.acme.security.webauthn;

import java.security.Principal;

import jakarta.ws.rs.GET;
import jakarta.ws.rs.Path;
import jakarta.ws.rs.Produces;
import jakarta.ws.rs.core.Context;
import jakarta.ws.rs.core.MediaType;
import jakarta.ws.rs.core.SecurityContext;

@Path("/api/public")
public class PublicResource {

    @GET
    @Produces(MediaType.TEXT_PLAIN)
    public String publicResource() {
        return "public";
   }

    @GET
    @Path("/me")
    @Produces(MediaType.TEXT_PLAIN)
    public String me(@Context SecurityContext securityContext) {
        Principal user = securityContext.getUserPrincipal();
        return user != null ? user.getName() : "<not logged in>";
    }
}
The source code for the /api/admin endpoint is also very simple. The main difference here is that we are using a @RolesAllowed annotation to make sure that only users granted with the admin role can access the endpoint:
package org.acme.security.webauthn;

import jakarta.annotation.security.RolesAllowed;
import jakarta.ws.rs.GET;
import jakarta.ws.rs.Path;
import jakarta.ws.rs.Produces;
import jakarta.ws.rs.core.MediaType;

@Path("/api/admin")
public class AdminResource {

    @GET
    @RolesAllowed("admin")
    @Produces(MediaType.TEXT_PLAIN)
    public String adminResource() {
         return "admin";
    }
}
Finally, let’s consider the /api/users/me endpoint. As you can see from the source code below, we are trusting only users with the user role.
We are using SecurityContext to get access to the current authenticated Principal and we return the user’s name. This information is loaded from the database.
package org.acme.security.webauthn;

import jakarta.annotation.security.RolesAllowed;
import jakarta.ws.rs.GET;
import jakarta.ws.rs.Path;
import jakarta.ws.rs.core.Context;
import jakarta.ws.rs.core.SecurityContext;

@Path("/api/users")
public class UserResource {

    @GET
    @RolesAllowed("user")
    @Path("/me")
    public String me(@Context SecurityContext securityContext) {
        return securityContext.getUserPrincipal().getName();
    }
}
Storing our WebAuthn credentials
We can now describe how our WebAuthn credentials are stored in our database with two entities. Note that we’ve simplified the model in order to only store one credential per user (who could actually have more than one WebAuthn credential and other data such as roles):
package org.acme.security.webauthn;

import java.util.List;
import java.util.UUID;

import io.quarkus.hibernate.orm.panache.PanacheEntityBase;
import io.quarkus.security.webauthn.WebAuthnCredentialRecord;
import io.quarkus.security.webauthn.WebAuthnCredentialRecord.RequiredPersistedData;
import jakarta.persistence.Entity;
import jakarta.persistence.Id;
import jakarta.persistence.OneToOne;

@Entity
public class WebAuthnCredential extends PanacheEntityBase {

	@Id
    public String credentialId;

    public byte[] publicKey;
    public long publicKeyAlgorithm;
    public long counter;
    public UUID aaguid;

    // this is the owning side
    @OneToOne
    public User user;

    public WebAuthnCredential() {
    }

    public WebAuthnCredential(WebAuthnCredentialRecord credentialRecord, User user) {
        RequiredPersistedData requiredPersistedData =
            credentialRecord.getRequiredPersistedData();
        aaguid = requiredPersistedData.aaguid();
        counter = requiredPersistedData.counter();
        credentialId = requiredPersistedData.credentialId();
        publicKey = requiredPersistedData.publicKey();
        publicKeyAlgorithm = requiredPersistedData.publicKeyAlgorithm();
        this.user = user;
        user.webAuthnCredential = this;
    }

    public WebAuthnCredentialRecord toWebAuthnCredentialRecord() {
        return WebAuthnCredentialRecord
                .fromRequiredPersistedData(
                        new RequiredPersistedData(user.username, credentialId,
                                                  aaguid, publicKey,
                                                  publicKeyAlgorithm, counter));
    }

    public static List<WebAuthnCredential> findByUsername(String username) {
        return list("user.username", username);
    }

    public static WebAuthnCredential findByCredentialId(String credentialId) {
        return findById(credentialId);
    }
}
And our user entity:
package org.acme.security.webauthn;

import io.quarkus.hibernate.orm.panache.PanacheEntity;
import jakarta.persistence.Column;
import jakarta.persistence.Entity;
import jakarta.persistence.OneToOne;
import jakarta.persistence.Table;

@Table(name = "user_table")
@Entity
public class User extends PanacheEntity {

    @Column(unique = true)
    public String username;

    // non-owning side, so we can add more credentials later
    @OneToOne(mappedBy = "user")
    public WebAuthnCredential webAuthnCredential;

    public static User findByUsername(String username) {
        return User.find("username", username).firstResult();
    }
}
A note about usernames and credential IDs
Usernames are unique and to your users. Every created WebAuthn credential record has a unique ID.
You can allow (if you want, but you don’t have to) your users to have more than one authenticator device, which means a single username can map to multiple credential IDs, all of which identify the same user.
Exposing your entities to Quarkus WebAuthn
You need to define a bean implementing the WebAuthnUserProvider in order to allow the Quarkus WebAuthn
extension to load and store credentials. This is where you tell Quarkus how to turn your data model into the
WebAuthn security model:
import java.util.Collections;
import java.util.List;
import java.util.Set;

import io.quarkus.security.webauthn.WebAuthnCredentialRecord;
import io.quarkus.security.webauthn.WebAuthnUserProvider;
import io.smallrye.common.annotation.Blocking;
import io.smallrye.mutiny.Uni;
import jakarta.enterprise.context.ApplicationScoped;
import jakarta.transaction.Transactional;

@Blocking
@ApplicationScoped
public class MyWebAuthnSetup implements WebAuthnUserProvider {

    @Transactional
    @Override
    public Uni<List<WebAuthnCredentialRecord>> findByUsername(String userId) {
        return Uni.createFrom().item(
            WebAuthnCredential.findByUsername(userId)
                              .stream()
                              .map(WebAuthnCredential::toWebAuthnCredentialRecord)
                              .toList());
    }

    @Transactional
    @Override
    public Uni<WebAuthnCredentialRecord> findByCredentialId(String credId) {
        WebAuthnCredential creds = WebAuthnCredential.findByCredentialId(credId);
        if(creds == null)
            return Uni.createFrom()
                      .failure(new RuntimeException("No such credential ID"));
        return Uni.createFrom().item(creds.toWebAuthnCredentialRecord());
    }

    @Transactional
    @Override
    public Uni<Void> store(WebAuthnCredentialRecord credentialRecord) {
        User newUser = new User();
        // We can only store one credential per username thanks to the unicity constraint
        // which will cause this transaction to fail and throw if the username already exists
        newUser.username = credentialRecord.getUsername();
        WebAuthnCredential credential = new WebAuthnCredential(credentialRecord, newUser);
        credential.persist();
        newUser.persist();
        return Uni.createFrom().voidItem();
    }

    @Transactional
    @Override
    public Uni<Void> update(String credentialId, long counter) {
        WebAuthnCredential credential =
            WebAuthnCredential.findByCredentialId(credentialId);
        credential.counter = counter;
        return Uni.createFrom().voidItem();
    }

    @Override
    public Set<String> getRoles(String userId) {
        if(userId.equals("admin")) {
            return Set.of("user", "admin");
        }
        return Collections.singleton("user");
    }
}
Warning: When implementing your own WebAuthnUserProvider.store method, make sure that you never allow creating
new credentials for a username that already exists. Otherwise you risk allowing third-parties to impersonate existing
users by letting them add their own credentials to existing accounts. If you want to allow existing users to register
more than one WebAuthn credential, you must make sure in WebAuthnUserProvider.store that the user is currently logged
in under the same username to which you want to add new credentials. In every other case, make sure to return a failed
Uni from this method. In this particular example, this is checked using a unicity constraint on the user name, which
will cause the transaction to fail if the user already exists.
Configuração
Because we want to delegate login and registration to the default Quarkus WebAuthn endpoints, we need to enable them
in configuration (src/main/resources/application.properties):
quarkus.webauthn.enable-login-endpoint=true
quarkus.webauthn.enable-registration-endpoint=true
Writing the HTML application
We now need to write a web page with links to all our APIs, as well as a way to register a new user, login, and logout,
in src/main/resources/META-INF/resources/index.html:
<!DOCTYPE html>
<html lang="en">
  <head>
    <meta charset="UTF-8">
    <title>Login</title>
    <script src="/q/webauthn/webauthn.js" type="text/javascript" charset="UTF-8"></script>
    <style>
     .container {
      display: grid;
      grid-template-columns: auto auto auto;
     }
     button, input {
      margin: 5px 0;
     }
     .item {
      padding: 20px;
     }
     nav > ul {
       list-style-type: none;
       margin: 0;
       padding: 0;
       overflow: hidden;
       background-color: #333;
     }

     nav > ul > li {
       float: left;
     }

     nav > ul > li > a {
       display: block;
       color: white;
       text-align: center;
       padding: 14px 16px;
       text-decoration: none;
     }

     nav > ul > li > a:hover {
       background-color: #111;
     }
    </style>
  </head>

  <body>
    <nav>
     <ul>
      <li><a href="/api/public">Public API</a></li>
      <li><a href="/api/users/me">User API</a></li>
      <li><a href="/api/admin">Admin API</a></li>
      <li><a href="/q/webauthn/logout">Logout</a></li>
     </ul>
    </nav>
    <div class="container">
     <div class="item">
      <h1>Status</h1>
      <div id="result"></div>
     </div>
     <div class="item">
      <h1>Login</h1>
      <p>
       <button id="login">Login</button>
      </p>
     </div>
     <div class="item">
      <h1>Register</h1>
      <p>
       <input id="usernameRegister" placeholder="User name"/><br/>
       <input id="firstName" placeholder="First name"/><br/>
       <input id="lastName" placeholder="Last name"/><br/>
       <button id="register">Register</button>
      </p>
     </div>
    </div>
    <script type="text/javascript">
      const webAuthn = new WebAuthn();

      const result = document.getElementById('result');

      fetch('/api/public/me')
        .then(response => response.text())
        .then(username => result.append("User: "+username));

      const loginButton = document.getElementById('login');

      loginButton.addEventListener("click", (e) => {
        result.replaceChildren();
        webAuthn.login()
          .then(x => fetch('/api/public/me'))
          .then(response => response.text())
          .then(username => {
            result.append("User: "+username);
          })
          .catch(err => {
            result.append("Login failed: "+err);
          });
        return false;
      });

      const registerButton = document.getElementById('register');

      registerButton.addEventListener("click", (e) => {
        var username = document.getElementById('usernameRegister').value;
        var firstName = document.getElementById('firstName').value;
        var lastName = document.getElementById('lastName').value;
        result.replaceChildren();
        webAuthn.register({ username: username, displayName: firstName + " " + lastName })
          .then(body => {
            result.append("User: "+username);
          })
          .catch(err => {
            result.append("Registration failed: "+err);
          });
        return false;
      });
    </script>
  </body>
</html>
Trying the application
The application is now protected and the identities are provided by our database.
Run your application in dev mode with:
quarkus dev./mvnw quarkus:dev./gradlew --console=plain quarkusDevwhich will start a PostgreSQL Dev Service container, and open http://localhost:8080 in your browser.
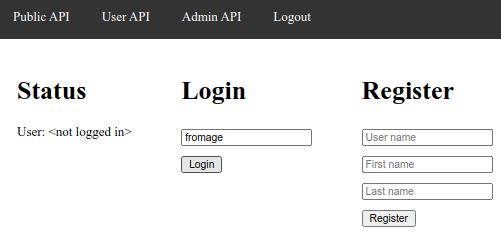
Initially, you will have no credentials registered, and no current user:
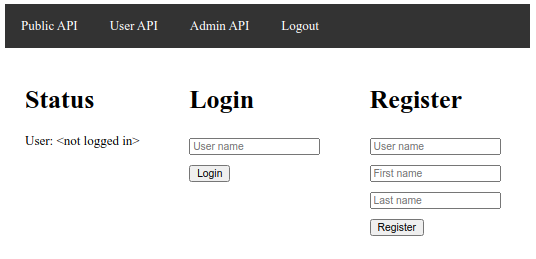
The current user is displayed on the left, and you can use the top menu to try accessing the public API, which should work, while the user and admin APIs will fail and redirect you to the current page.
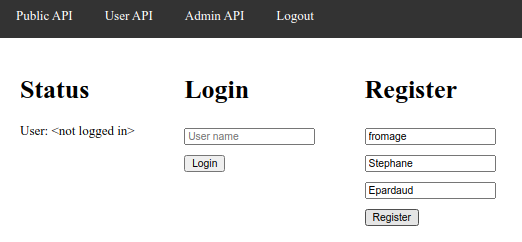
Start by registering your WebAuthn credentials by entering a username, first and last names on the Register
form on the right, then pressing the Register button:
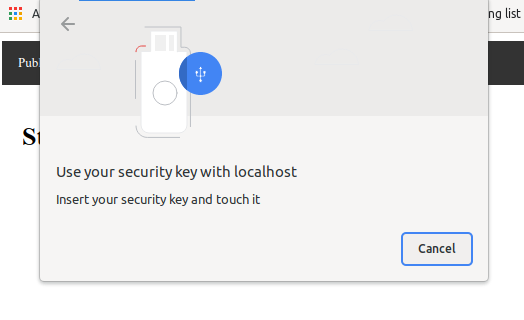
Your browser will ask you to activate your WebAuthn authenticator (you will need a WebAuthn-capable browser and possibly device, or you can use an emulator of those):
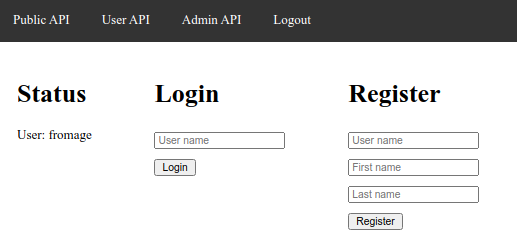
You will then be logged in, and can check that the user API is now accessible:
At this stage you can Logout:
Then press the Login button, and you will be logged in:
The admin API is only accessible if you register with the admin user name.
Explanation of the flow for WebAuthn authentication.
There are two modes of operation for how you want to handle user and credential creation:
By default, the solution we have seen handles user and credential creation and logins automatically via the WebAuthn endpoints provided out of the box by this extension.
In this scenario, all you have to to is provide a WebAuthnUserProvider to
tell Quarkus how to find, store and update your credentials (see
Exposing your entities to Quarkus WebAuthn).
Thus, triggering a registration on the client requires obtaining a challenge from the server (see Obtain a registration challenge), which will then be returned to the client which uses that to create new credentials and send them to the server (see Trigger a registration) which will store the credentials and log you in:

Later, triggering a login on the client requires obtaining a challenge from the server (see Obtain a login challenge), which will then be returned to the client which uses that to get the required credentials and send proof of them to the server (see Trigger a login) which will update the credentials and log you in:

If you want to customise the registration and login flow, you can also handle user and credential creation and logins yourself via your own logic (see Handling login and registration endpoints yourself).
WebAuthn endpoints
The Quarkus WebAuthn extension comes out of the box with these REST endpoints pre-defined:
Obtain a registration challenge
GET /q/webauthn/register-options-challenge?username=<username>&displayName=<displayName>: Set up and obtain a registration challenge
Query parameters:
-
usernameis a username. Required. -
displayNameis a human-palatable name for the user account. Optional.
This causes a cookie to be set for the challenge, it will be used by the registration step later.
{
 "rp": {
   "name": "Quarkus server"
  },
 "user": {
   "id": "ryPi43NJSx6LFYNitrOvHg",
   "name": "FroMage",
   "displayName": "Mr Nice Guy"
  },
  "challenge": "6tkVLgYzp5yJz_MtnzCy6VRMkHuN4f4C-_hukRmsuQ_MQl7uxJweiqH8gaFkm_mEbKzlUbOabJM3nLbi08i1Uw",
  "pubKeyCredParams": [
    {
     "alg": -7,
     "type":"public-key"
    },
    {
     "alg": -257,
     "type": "public-key"
    }
  ],
  "authenticatorSelection": {
    "requireResidentKey": true,
    "residentKey": "required",
    "userVerification": "required"
  },
  "timeout": 300000,
  "attestation": "none",
  "extensions": {
   "txAuthSimple": ""
  }
 }
Trigger a registration
POST /q/webauthn/register?username=<username>: Trigger a registration
Query parameters:
-
usernameis a username. Required.
This uses the challenge cookie set by the registration challenge and clears it. It
also uses your WebAuthnUserProvider to store the new credentials, and sets up
the session cookie to log you in.
This is only enabled if the quarkus.webauthn.enable-registration-endpoint configuration is set to true.
|
{
 "id": "boMwU-QwZ_RsToPTG3iC50g8-yiKbLc3A53tgWMhzbNEQAJIlbWgchmwbt5m0ssqQNR0IM_WxCmcfKWlEao7Fg",
 "rawId": "boMwU-QwZ_RsToPTG3iC50g8-yiKbLc3A53tgWMhzbNEQAJIlbWgchmwbt5m0ssqQNR0IM_WxCmcfKWlEao7Fg",
 "response": {
  "attestationObject": "<DATA>",
  "clientDataJSON":"<DATA>"
 },
 "type": "public-key"
}
This returns a 204 with no body.
Obtain a login challenge
GET /q/webauthn/login-options-challenge?username=<username>: Set up and obtain a login challenge
Query parameters:
-
usernameis a username. Optional in the case of Discoverable Credentials (with PassKeys).
This causes a cookie to be set for the challenge, it will be used by the login step later.
{
 "challenge": "RV4hqKHezkWSxpOICBkpx16yPJFGMZrkPlJP-Wp8w4rVl34VIzCT7AP0Q5Rv-3JCU3jwu-j3VlOgyNMDk2AqDg",
 "timeout": 300000,
 "userVerification": "required",
 "extensions": {
  "txAuthSimple": ""
 },
 "allowCredentials": [
  {
   "type": "public-key",
   "id": "boMwU-QwZ_RsToPTG3iC50g8-yiKbLc3A53tgWMhzbNEQAJIlbWgchmwbt5m0ssqQNR0IM_WxCmcfKWlEao7Fg",
   "transports": [
    "usb",
    "nfc",
    "ble",
    "internal"
   ]
  }
 ]
}
Trigger a login
This uses the challenge cookie set by the login challenge and clears it. It
also uses your WebAuthnUserProvider to find and update the credentials, and sets up
the session cookie to log you in.
This is only enabled if the quarkus.webauthn.enable-login-endpoint configuration is set to true.
|
{
 "id": "boMwU-QwZ_RsToPTG3iC50g8-yiKbLc3A53tgWMhzbNEQAJIlbWgchmwbt5m0ssqQNR0IM_WxCmcfKWlEao7Fg",
 "rawId": "boMwU-QwZ_RsToPTG3iC50g8-yiKbLc3A53tgWMhzbNEQAJIlbWgchmwbt5m0ssqQNR0IM_WxCmcfKWlEao7Fg",
 "response": {
  "clientDataJSON": "<DATA>",
  "authenticatorData": "<DATA>",
  "signature": "<DATA>",
  "userHandle": ""
 },
 "type": "public-key"
}
This returns a 204 with no body.
Logout
GET /q/webauthn/logout: Logs you out
This will clear the session cookie to log you out.
This returns a 302 redirect to the root URI of your application.
Related Origins
GET /.well-known/webauthn: Retreives the list of related origins.
This defaults to the current origin on which Quarkus is deployed, but can be configured.
{
  "origins": [
    "https://shopping.com",
    "https://shopping.co.uk",
    "https://shopping.co.jp",
    "https://shopping.ie",
    "https://shopping.ca",
    "https://shopping.net",
    "https://shopping.org",
    "https://shopping.github.io"
  ]
}
WebAuthn JavaScript library
Because there’s so much JavaScript needed to set WebAuthn up in the browser, the Quarkus WebAuthn extension ships with
a JavaScript library to help you talk to the WebAuthn endpoints, at /q/webauthn/webauthn.js. You can set it up like this:
<script src="/q/webauthn/webauthn.js" type="text/javascript" charset="UTF-8"></script>
<script type="text/javascript">
  // keep the default /q/webauthn endpoints
  const webAuthn = new WebAuthn();
  // use the webAuthn APIs here
</script>
Or, if you need to customise the endpoints:
<script src="/q/webauthn/webauthn.js" type="text/javascript" charset="UTF-8"></script>
<script type="text/javascript">
  // configure where our endpoints are
  const webAuthn = new WebAuthn({
    registerOptionsChallengePath: '/q/webauthn/register-options-challenge',
    loginOptionsChallengePath: '/q/webauthn/login-options-challenge',
    registerPath: '/q/webauthn/register',
    loginPath: '/q/webauthn/login'
  });
  // use the webAuthn APIs here
</script>
CSRF considerations
If you use the endpoints provided by Quarkus, they will not be protected by CSRF, but if you define your own endpoints and use this JavaScript library to access them you will need to configure CSRF via headers:
<script src="/q/webauthn/webauthn.js" type="text/javascript" charset="UTF-8"></script>
<script type="text/javascript">
  // configure where our endpoints are
  const webAuthn = new WebAuthn({
    'csrf': {
      'header': '{inject:csrf.headerName}',
      'value': '{inject:csrf.token}'
	}
  });
  // use the webAuthn APIs here
</script>
Invoke registration
The webAuthn.register method invokes the registration challenge endpoint, then calls the authenticator and invokes the registration endpoint
for that registration, and returns a Promise object:
webAuthn.register({ username: username, displayName: firstName + " " + lastName })
  .then(body => {
    // do something now that the user is registered
  })
  .catch(err => {
    // registration failed
  });
Invoke login
The webAuthn.login method invokes the login challenge endpoint, then calls the authenticator and invokes the login endpoint
for that login, and returns a Promise object:
webAuthn.login({ username: username }) (1)
  .then(body => {
    // do something now that the user is logged in
  })
  .catch(err => {
    // login failed
});| 1 | The username is optional, in the case of Discoverable Credentials (with PassKeys) |
Only invoke the registration challenge and authenticator
The webAuthn.registerClientSteps method invokes the registration challenge endpoint, then calls the authenticator and returns
a Promise object containing a
JSON object suitable for being sent to the registration endpoint. You can use that JSON object in order to store the credentials
in hidden form input elements, for example, and send it as part of a regular HTML form:
webAuthn.registerClientSteps({ username: username, displayName: firstName + " " + lastName })
  .then(body => {
    // store the registration JSON in form elements
    document.getElementById('webAuthnId').value = body.id;
    document.getElementById('webAuthnRawId').value = body.rawId;
    document.getElementById('webAuthnResponseAttestationObject').value = body.response.attestationObject;
    document.getElementById('webAuthnResponseClientDataJSON').value = body.response.clientDataJSON;
    document.getElementById('webAuthnType').value = body.type;
  })
  .catch(err => {
    // registration failed
  });
Only invoke the login challenge and authenticator
The webAuthn.loginClientSteps method invokes the login challenge endpoint, then calls the authenticator and returns
a Promise object containing a
JSON object suitable for being sent to the login endpoint. You can use that JSON object in order to store the credentials
in hidden form input elements, for example, and send it as part of a regular HTML form:
webAuthn.loginClientSteps({ username: username }) (1)
  .then(body => {
    // store the login JSON in form elements
    document.getElementById('webAuthnId').value = body.id;
    document.getElementById('webAuthnRawId').value = body.rawId;
    document.getElementById('webAuthnResponseClientDataJSON').value = body.response.clientDataJSON;
    document.getElementById('webAuthnResponseAuthenticatorData').value = body.response.authenticatorData;
    document.getElementById('webAuthnResponseSignature').value = body.response.signature;
    document.getElementById('webAuthnResponseUserHandle').value = body.response.userHandle;
    document.getElementById('webAuthnType').value = body.type;
  })
  .catch(err => {
    // login failed
});| 1 | The username is optional, in the case of Discoverable Credentials (with PassKeys) |
Handling login and registration endpoints yourself
Sometimes, you will want to ask for more data than just a username in order to register a user, or you want to deal with login and registration with custom validation, and so the default WebAuthn login and registration endpoints are not enough.
In this case, you can use the WebAuthn.loginClientSteps and WebAuthn.registerClientSteps methods from the JavaScript
library, store the authenticator data in hidden form elements, and send them as part of your form payload
to the server to your custom login or registration endpoints.
If you are storing them in form input elements, you can then use the WebAuthnLoginResponse and
WebAuthnRegistrationResponse classes,
mark them as @BeanParam and then use the
WebAuthnSecurity.login
and WebAuthnSecurity.register
methods to replace the /q/webauthn/login and /q/webauthn/register endpoints.
In most cases you can keep using the /q/webauthn/login-options-challenge and /q/webauthn/register-options-challenge challenge-initiating
endpoints, because this is not where custom logic is required.
In this case, the registration flow is a little different because you will write your own registration endpoint which will handle storing of the credentials and setting up the session cookie:

Similarly, the login flow is a little different because you will write your own login endpoint which will handle updating the credentials and setting up the session cookie:

If you handle user and credential creation and logins yourself in your endpoints, you only need
to provide a read-only view of your entities in your WebAuthnUserProvider, so you can skip
the store and update methods:
package org.acme.security.webauthn;

import java.util.List;

import io.quarkus.security.webauthn.WebAuthnCredentialRecord;
import io.quarkus.security.webauthn.WebAuthnUserProvider;
import io.smallrye.common.annotation.Blocking;
import io.smallrye.mutiny.Uni;
import jakarta.enterprise.context.ApplicationScoped;
import jakarta.transaction.Transactional;
import model.WebAuthnCredential;

@Blocking
@ApplicationScoped
public class MyWebAuthnSetup implements WebAuthnUserProvider {

    @Transactional
    @Override
    public Uni<List<WebAuthnCredentialRecord>> findByUsername(String username) {
        return Uni.createFrom().item(
            WebAuthnCredential.findByUsername(username)
                              .stream()
                              .map(WebAuthnCredential::toWebAuthnCredentialRecord)
                              .toList());
    }

    @Transactional
    @Override
    public Uni<WebAuthnCredentialRecord> findByCredentialId(String credentialId) {
        WebAuthnCredential creds = WebAuthnCredential.findByCredentialId(credentialId);
        if(creds == null)
            return Uni.createFrom()
                      .failure(new RuntimeException("No such credential ID"));
        return Uni.createFrom().item(creds.toWebAuthnCredentialRecord());
    }

    @Override
    public Set<String> getRoles(String userId) {
        if(userId.equals("admin")) {
            return Set.of("user", "admin");
        }
        return Collections.singleton("user");
    }
}
When setting up your own login and registration endpoints, you don’t need to enable the default endpoints, so you can
remove the quarkus.webauthn.enable-login-endpoint and quarkus.webauthn.enable-registration-endpoint configuration.
|
Thankfully, you can use the WebAuthnSecurity bean to handle the WebAuthn-specific part of
your registration and login endpoints, and focus on your own logic:
package org.acme.security.webauthn;

import jakarta.inject.Inject;
import jakarta.transaction.Transactional;
import jakarta.ws.rs.BeanParam;
import jakarta.ws.rs.POST;
import jakarta.ws.rs.Path;
import jakarta.ws.rs.core.Response;
import jakarta.ws.rs.core.Response.Status;

import org.jboss.resteasy.reactive.RestForm;

import io.quarkus.security.webauthn.WebAuthnCredentialRecord;
import io.quarkus.security.webauthn.WebAuthnLoginResponse;
import io.quarkus.security.webauthn.WebAuthnRegisterResponse;
import io.quarkus.security.webauthn.WebAuthnSecurity;
import io.vertx.ext.web.RoutingContext;

@Path("")
public class LoginResource {

    @Inject
    WebAuthnSecurity webAuthnSecurity;

    // Provide an alternative implementation of the /q/webauthn/login endpoint
    @Path("/login")
    @POST
    @Transactional
    public Response login(@BeanParam WebAuthnLoginResponse webAuthnResponse,
                          RoutingContext ctx) {
        // Input validation
        if(!webAuthnResponse.isSet() || !webAuthnResponse.isValid()) {
            return Response.status(Status.BAD_REQUEST).build();
        }

        try {
            WebAuthnCredentialRecord credentialRecord = this.webAuthnSecurity.login(webAuthnResponse, ctx).await().indefinitely();
            User user = User.findByUsername(credentialRecord.getUsername());
            if(user == null) {
                // Invalid user
                return Response.status(Status.BAD_REQUEST).build();
            }
            // bump the auth counter
            user.webAuthnCredential.counter = credentialRecord.getCounter();
            // make a login cookie
            this.webAuthnSecurity.rememberUser(credentialRecord.getUsername(), ctx);
            return Response.ok().build();
        } catch (Exception exception) {
            // handle login failure - make a proper error response
            return Response.status(Status.BAD_REQUEST).build();
        }
    }

    // Provide an alternative implementation of the /q/webauthn/register endpoint
    @Path("/register")
    @POST
    @Transactional
    public Response register(@RestForm String username,
                             @BeanParam WebAuthnRegisterResponse webAuthnResponse,
                             RoutingContext ctx) {
        // Input validation
        if(username == null || username.isEmpty()
           || !webAuthnResponse.isSet() || !webAuthnResponse.isValid()) {
            return Response.status(Status.BAD_REQUEST).build();
        }

        User user = User.findByUsername(username);
        if(user != null) {
            // Duplicate user
            return Response.status(Status.BAD_REQUEST).build();
        }
        try {
            // store the user
            WebAuthnCredentialRecord credentialRecord =
                webAuthnSecurity.register(username, webAuthnResponse, ctx).await().indefinitely();
            User newUser = new User();
            newUser.username = credentialRecord.getUsername();
            WebAuthnCredential credential =
                new WebAuthnCredential(credentialRecord, newUser);
            credential.persist();
            newUser.persist();
            // make a login cookie
            this.webAuthnSecurity.rememberUser(newUser.username, ctx);
            return Response.ok().build();
        } catch (Exception ignored) {
            // handle login failure
            // make a proper error response
            return Response.status(Status.BAD_REQUEST).build();
        }
    }
}
The WebAuthnSecurity
methods do not set or read the session cookie, so you will have to take care
of it yourself, but it allows you to use other means of storing the user, such as JWT. You can use the
WebAuthnSecurity.rememberUser
and WebAuthnSecurity.logout
methods on the same WebAuthnSecurity class if you want to manually set up login cookies.
|
Blocking version
If you’re using a blocking data access to the database, you can safely block on the
WebAuthnSecurity methods,
with .await().indefinitely(), because nothing is async in the register and login methods, besides the
data access with your WebAuthnUserProvider.
You will have to add the @Blocking annotation on your WebAuthnUserProvider class in order for the
Quarkus WebAuthn endpoints to defer those calls to the worker pool.
Virtual-Threads version
If you’re using a blocking data access to the database, you can safely block on the
WebAuthnSecurity methods,
with .await().indefinitely(), because nothing is async in the register and login methods, besides the
data access with your WebAuthnUserProvider.
You will have to add the @RunOnVirtualThread annotation on your WebAuthnUserProvider class in order to tell the
Quarkus WebAuthn endpoints to defer those calls to the worker pool.
Testing WebAuthn
Testing WebAuthn can be complicated because normally you need a hardware token, which is why we’ve made the
quarkus-test-security-webauthn helper library:
<dependency>
    <groupId>io.quarkus</groupId>
    <artifactId>quarkus-test-security-webauthn</artifactId>
    <scope>test</scope>
</dependency>testImplementation("io.quarkus:quarkus-test-security-webauthn")With this, you can use WebAuthnHardware
to emulate an authenticator token, as well as the
WebAuthnEndpointHelper
helper methods in order to invoke the WebAuthn endpoints, or even fill your form
data for custom endpoints:
package org.acme.security.webauthn.test;

import static io.restassured.RestAssured.given;

import java.net.URL;
import java.util.function.Consumer;

import org.hamcrest.Matchers;
import org.junit.jupiter.api.Test;

import io.quarkus.test.common.http.TestHTTPResource;
import io.quarkus.test.junit.QuarkusTest;
import io.quarkus.test.security.webauthn.WebAuthnEndpointHelper;
import io.quarkus.test.security.webauthn.WebAuthnHardware;
import io.restassured.RestAssured;
import io.restassured.filter.Filter;
import io.restassured.filter.cookie.CookieFilter;
import io.restassured.specification.RequestSpecification;
import io.vertx.core.json.JsonObject;

@QuarkusTest
public class WebAuthnResourceTest {

    enum User {
        USER, ADMIN;
    }
    enum Endpoint {
        DEFAULT, MANUAL;
    }

    @TestHTTPResource
    URL url;

    @Test
    public void testWebAuthnUser() {
        testWebAuthn("FroMage", User.USER, Endpoint.DEFAULT);
        testWebAuthn("scooby", User.USER, Endpoint.MANUAL);
    }

    @Test
    public void testWebAuthnAdmin() {
        testWebAuthn("admin", User.ADMIN, Endpoint.DEFAULT);
    }

    private void testWebAuthn(String username, User user, Endpoint endpoint) {
        Filter cookieFilter = new CookieFilter();
        WebAuthnHardware token = new WebAuthnHardware(url);

        verifyLoggedOut(cookieFilter);

        // two-step registration
        String challenge = WebAuthnEndpointHelper.obtainRegistrationChallenge(username, cookieFilter);
        JsonObject registrationJson = token.makeRegistrationJson(challenge);
        if(endpoint == Endpoint.DEFAULT)
            WebAuthnEndpointHelper.invokeRegistration(username, registrationJson, cookieFilter);
        else {
            invokeCustomEndpoint("/register", cookieFilter, request -> {
                WebAuthnEndpointHelper.addWebAuthnRegistrationFormParameters(request, registrationJson);
                request.formParam("username", username);
            });
        }

        // verify that we can access logged-in endpoints
        verifyLoggedIn(cookieFilter, username, user);

        // logout
        WebAuthnEndpointHelper.invokeLogout(cookieFilter);

        verifyLoggedOut(cookieFilter);

        // two-step login
        challenge = WebAuthnEndpointHelper.obtainLoginChallenge(null, cookieFilter);
        JsonObject loginJson = token.makeLoginJson(challenge);
        if(endpoint == Endpoint.DEFAULT)
            WebAuthnEndpointHelper.invokeLogin(loginJson, cookieFilter);
        else {
            invokeCustomEndpoint("/login", cookieFilter, request -> {
                WebAuthnEndpointHelper.addWebAuthnLoginFormParameters(request, loginJson);
            });
        }

        // verify that we can access logged-in endpoints
        verifyLoggedIn(cookieFilter, username, user);

        // logout
        WebAuthnEndpointHelper.invokeLogout(cookieFilter);

        verifyLoggedOut(cookieFilter);
    }

    private void invokeCustomEndpoint(String uri, Filter cookieFilter, Consumer<RequestSpecification> requestCustomiser) {
        RequestSpecification request = given()
        .when();
        requestCustomiser.accept(request);
        request
        .filter(cookieFilter)
        .redirects().follow(false)
        .log().ifValidationFails()
        .post(uri)
        .then()
        .statusCode(200)
        .log().ifValidationFails()
        .cookie(WebAuthnEndpointHelper.getChallengeCookie(), Matchers.is(""))
        .cookie(WebAuthnEndpointHelper.getMainCookie(), Matchers.notNullValue());
    }

    private void verifyLoggedIn(Filter cookieFilter, String username, User user) {
        // public API still good
        RestAssured.given().filter(cookieFilter)
        .when()
        .get("/api/public")
        .then()
        .statusCode(200)
        .body(Matchers.is("public"));
        // public API user name
        RestAssured.given().filter(cookieFilter)
        .when()
        .get("/api/public/me")
        .then()
        .statusCode(200)
        .body(Matchers.is(username));

        // user API accessible
        RestAssured.given().filter(cookieFilter)
        .when()
        .get("/api/users/me")
        .then()
        .statusCode(200)
        .body(Matchers.is(username));

        // admin API?
        if(user == User.ADMIN) {
            RestAssured.given().filter(cookieFilter)
            .when()
            .get("/api/admin")
            .then()
            .statusCode(200)
            .body(Matchers.is("admin"));
        } else {
            RestAssured.given().filter(cookieFilter)
            .when()
            .get("/api/admin")
            .then()
            .statusCode(403);
        }
    }

    private void verifyLoggedOut(Filter cookieFilter) {
        // public API still good
        RestAssured.given().filter(cookieFilter)
        .when()
        .get("/api/public")
        .then()
        .statusCode(200)
        .body(Matchers.is("public"));
        // public API user name
        RestAssured.given().filter(cookieFilter)
        .when()
        .get("/api/public/me")
        .then()
        .statusCode(200)
        .body(Matchers.is("<not logged in>"));

        // user API not accessible
        RestAssured.given()
        .filter(cookieFilter)
        .redirects().follow(false)
        .when()
        .get("/api/users/me")
        .then()
        .statusCode(302)
        .header("Location", Matchers.is("http://localhost:8081/"));

        // admin API not accessible
        RestAssured.given()
        .filter(cookieFilter)
        .redirects().follow(false)
        .when()
        .get("/api/admin")
        .then()
        .statusCode(302)
        .header("Location", Matchers.is("http://localhost:8081/"));
    }
}
For this test, since we’re testing both the provided callback endpoint, which updates users
in its WebAuthnUserProvider and the manual LoginResource endpoint, which deals with users
manually, we need to override the WebAuthnUserProvider with one that doesn’t update the
scooby user:
package org.acme.security.webauthn.test;

import org.acme.security.webauthn.MyWebAuthnSetup;
import org.acme.security.webauthn.WebAuthnCredential;

import io.quarkus.security.webauthn.WebAuthnCredentialRecord;
import io.quarkus.test.Mock;
import io.smallrye.mutiny.Uni;
import jakarta.enterprise.context.ApplicationScoped;
import jakarta.transaction.Transactional;

@Mock
@ApplicationScoped
public class TestUserProvider extends MyWebAuthnSetup {
    @Transactional
    @Override
    public Uni<Void> store(WebAuthnCredentialRecord credentialRecord) {
        // this user is handled in the LoginResource endpoint manually
        if (credentialRecord.getUsername().equals("scooby")) {
            return Uni.createFrom().voidItem();
        }
        return super.store(credentialRecord);
    }

    @Transactional
    @Override
    public Uni<Void> update(String credentialId, long counter) {
        WebAuthnCredential credential = WebAuthnCredential.findByCredentialId(credentialId);
        // this user is handled in the LoginResource endpoint manually
        if (credential.user.username.equals("scooby")) {
        	return Uni.createFrom().voidItem();
        }
        return super.update(credentialId, counter);
    }
}
Referência de configuração
The security encryption key can be set with the
quarkus.http.auth.session.encryption-key
configuration option, as described in the security guide.
Propriedade de Configuração Fixa no Momento da Compilação - Todas as outras propriedades de configuração podem ser sobrepostas em tempo de execução.
Configuration property |
Tipo |
Padrão |
|---|---|---|
If the WebAuthn extension is enabled. Environment variable: Show more |
booleano |
|
The origins of the application. The origin is basically protocol, host and port. If you are calling WebAuthn API while your application is located at Environment variable: Show more |
list of string |
|
Authenticator Transports allowed by the application. Authenticators can interact with the user web browser through several transports. Applications may want to restrict the transport protocols for extra security hardening reasons. By default, all transports should be allowed. If your application is to be used by mobile phone users, you may want to restrict only the
Environment variable: Show more |
list of |
|
The id (or domain name of your server, as obtained from the first entry of Environment variable: Show more |
string |
|
A user friendly name for your server Environment variable: Show more |
string |
|
Kind of Authenticator Attachment allowed. Authenticators can connect to your device in two forms:
For security reasons your application may choose to restrict to a specific attachment mode. If omitted, then any mode is permitted. Environment variable: Show more |
|
|
Load the FIDO metadata for verification. See https://fidoalliance.org/metadata/. Only useful for attestations different from Environment variable: Show more |
booleano |
|
Resident key required. A resident (private) key, is a key that cannot leave your authenticator device, this means that you cannot reuse the authenticator to log into a second computer. Environment variable: Show more |
|
|
User Verification requirements. Webauthn applications may choose
Environment variable: Show more |
|
|
User presence requirements. Environment variable: Show more |
booleano |
|
Non-negative User Verification timeout. Authentication must occur within the timeout, this will prevent the user browser from being blocked with a pop-up required user verification, and the whole ceremony must be completed within the timeout period. After the timeout, any previously issued challenge is automatically invalidated. Environment variable: Show more |
|
|
Device Attestation Preference. During registration, applications may want to attest the device. Attestation is a cryptographic verification of the authenticator hardware. Attestation implies that the privacy of the users may be exposed and browsers might override the desired configuration on the user’s behalf. Valid values are:
Environment variable: Show more |
|
|
Allowed Public Key Credential algorithms by preference order. Webauthn mandates that all authenticators must support at least the following 2 algorithms: Environment variable: Show more |
list of |
|
Length of the challenges exchanged between the application and the browser. Challenges must be at least 32 bytes. Environment variable: Show more |
int |
|
The login page Environment variable: Show more |
string |
|
The inactivity (idle) timeout When inactivity timeout is reached, cookie is not renewed and a new login is enforced. Environment variable: Show more |
|
|
How old a cookie can get before it will be replaced with a new cookie with an updated timeout, also referred to as "renewal-timeout". Note that smaller values will result in slightly more server load (as new encrypted cookies will be generated more often); however, larger values affect the inactivity timeout because the timeout is set when a cookie is generated. For example if this is set to 10 minutes, and the inactivity timeout is 30m, if a user’s last request is when the cookie is 9m old then the actual timeout will happen 21m after the last request because the timeout is only refreshed when a new cookie is generated. That is, no timeout is tracked on the server side; the timestamp is encoded and encrypted in the cookie itself, and it is decrypted and parsed with each request. Environment variable: Show more |
|
|
The cookie that is used to store the persistent session Environment variable: Show more |
string |
|
The cookie that is used to store the challenge data during login/registration Environment variable: Show more |
string |
|
SameSite attribute for the session cookie. Environment variable: Show more |
|
|
The cookie path for the session cookies. Environment variable: Show more |
string |
|
Max-Age attribute for the session cookie. This is the amount of time the browser will keep the cookie. The default value is empty, which means the cookie will be kept until the browser is closed. Environment variable: Show more |
||
Set to Environment variable: Show more |
booleano |
|
Set to Environment variable: Show more |
booleano |
|
WebAuthn authentication mechanism priority. Environment variable: Show more |
int |
|
|
About the Duration format
To write duration values, use the standard Você também pode usar um formato simplificado, começando com um número:
Em outros casos, o formato simplificado é traduzido para o formato 'java.time.Duration' para análise:
|