Using the Infinispan Client
This guide demonstrates how your Quarkus application can connect to an Infinispan server using the Infinispan Client extension.
Pré-requisitos
Para concluir este guia, você precisa:
-
Cerca de 15 minutos
-
Um IDE
-
JDK 17+ instalado com
JAVA_HOMEconfigurado corretamente -
Apache Maven 3.9.16
-
Opcionalmente, o Quarkus CLI se você quiser usá-lo
-
Opcionalmente, Mandrel ou GraalVM instalado e configurado apropriadamente se você quiser criar um executável nativo (ou Docker se você usar uma compilação de contêiner nativo)
-
Um ambiente Docker funcional
Arquitetura
In this guide, we are going to expose a Greeting Rest API to create and display greeting messages by using
the Infinispan RemoteCache API
and getAsync and putAsync operations.
We’ll be using the Quarkus Infinispan Client extension to connect to interact with Infinispan.
Solução
Recomendamos que siga as instruções nas seções seguintes e crie a aplicação passo a passo. No entanto, você pode ir diretamente para o exemplo completo.
Clone o repositório Git: git clone https://github.com/quarkusio/quarkus-quickstarts.git, ou baixe um arquivo.
The solution is located in the infinispan-client-quickstart directory.
Criando o projeto Maven
Primeiro, precisamos de um novo projeto. Crie um novo projeto com o seguinte comando:
Para usuários do Windows:
-
Se estiver usando cmd, (não use barra invertida '\' e coloque tudo na mesma linha)
-
Se estiver usando o Powershell, envolva os parâmetros '-D' entre aspas duplas, por exemplo, '"-DprojectArtifactId=infinispan-client-quickstart"'
This command generates a new project, importing the Infinispan Client extension.
If you already have your Quarkus project configured, you can add the infinispan-client extension
to your project by running the following command in your project base directory:
quarkus extension add infinispan-client./mvnw quarkus:add-extension -Dextensions='infinispan-client'./gradlew addExtension --extensions='infinispan-client'Isto irá adicionar o seguinte trecho no seu arquivo de build:
<dependency>
    <groupId>io.quarkus</groupId>
    <artifactId>quarkus-infinispan-client</artifactId>
</dependency>implementation("io.quarkus:quarkus-infinispan-client")
annotationProcessor 'org.infinispan.protostream:protostream-processor:4.6.1.Final' (1)| 1 | Mandatory in the Gradle build to enable the generation of the files in the annotation based serialization |
Creating the Greeting POJO
We are going to model our increments using the Greeting POJO.
Create the src/main/java/org/acme/infinispan/client/Greeting.java file, with the following content:
package org.acme.infinispan.client;

import org.infinispan.protostream.annotations.Proto;

@Proto (1)
public record Greeting(String name, String message) {} (2)| 1 | You only need an annotation to tag the record to be marshalled by Protostream |
Note that we are not going to use Java serialization. Protostream is a serialization library based on Protobuf data format part of Infinispan. Using an annotation based API, we will store our data in Protobuf format.
Creating the Greeting Schema
We are going to create our serialization schema using the GreetingSchema interface.
Create the src/main/java/org/acme/infinispan/client/GreetingSchema.java file, with the following content:
package org.acme.infinispan.client;

import org.infinispan.protostream.GeneratedSchema;
import org.infinispan.protostream.annotations.ProtoSchema;

@ProtoSchema(includeClasses = Greeting.class) (1)
public interface GreetingSchema extends GeneratedSchema { (2)
}| 1 | Includes the Greeting pojo with the @ProtoSchema annotation |
| 2 | Extends GeneratedSchema Protostream API interface |
The Protobuf Schema that will be generated and used both on client and Infinispan Server side, will have the following content:
// File name: GreetingSchema.proto
// Generated from : org.acme.infinispan.client.GreetingSchema

syntax = "proto3";

message Greeting {

   optional string name = 1;

   optional string message = 2;
}|
You must include the Protostream annotations processor in your build file. Starting with Java 24, schema generation will not work unless this annotation processor is explicitly added. Maven
build.gradle
|
Creating the Infinispan Greeting Resource
Create the src/main/java/org/acme/infinispan/client/InfinispanGreetingResource.java file, with the following content:
package org.acme.infinispan.client;

import io.quarkus.infinispan.client.Remote;
import jakarta.inject.Inject;
import jakarta.ws.rs.GET;
import jakarta.ws.rs.POST;
import jakarta.ws.rs.Path;
import org.infinispan.client.hotrod.RemoteCache;

import java.util.concurrent.CompletionStage;

@Path("/greeting")
public class InfinispanGreetingResource {

    @Inject
    @Remote("mycache") (1)
    RemoteCache<String, Greeting> cache; (2)

    @POST
    @Path("/{id}")
    public CompletionStage<String> postGreeting(String id, Greeting greeting) {
        return cache.putAsync(id, greeting) (3)
              .thenApply(g -> "Greeting done!")
              .exceptionally(ex -> ex.getMessage());
    }

    @GET
    @Path("/{id}")
    public CompletionStage<Greeting> getGreeting(String id) {
        return cache.getAsync(id); (4)
    }
}| 1 | Use the @Remote annotation to use a cache. If the cache does not exist, will be created with a
default configuration on first access. |
| 2 | Inject the RemoteCache |
| 3 | Put the greeting id as a key and the Greeting pojo as a value |
| 4 | Get the greeting by id as the key |
Criando a classe de teste
Edite o arquivo pom.xml para adicionar a seguinte dependência:
<dependency>
    <groupId>io.rest-assured</groupId>
    <artifactId>rest-assured</artifactId>
    <scope>test</scope>
</dependency>
Create the src/test/java/org/acme/infinispan/client/InfinispanGreetingResourceTest.java file with the following content:
package org.acme.infinispan.client;

import io.quarkus.test.junit.QuarkusTest;
import io.restassured.http.ContentType;
import org.junit.jupiter.api.Test;

import static io.restassured.RestAssured.given;
import static org.hamcrest.CoreMatchers.is;

@QuarkusTest
class InfinispanGreetingResourceTest {

    @Test
    public void testHelloEndpoint() {
        given()
              .contentType(ContentType.JSON)
              .body("{\"name\":\"Infinispan Client\",\"message\":\"Hello World, Infinispan is up!\"}")
              .when()
              .post("/greeting/quarkus")
              .then()
              .statusCode(200);

        given()
                .when().get("/greeting/quarkus")
                .then()
                .statusCode(200)
                .body(is("{\"name\":\"Infinispan Client\",\"message\":\"Hello World, Infinispan is up!\"}"));
    }
}
Executando a aplicação
We just need to run the application using:
quarkus dev./mvnw quarkus:dev./gradlew --console=plain quarkusDevWe should have the Infinispan server running thanks to the Dev Services.
We can access the Dev Services UI through http://localhost:8080/q/dev/.
The Dev UI should display the Infinispan UI Panel.
|
Click on the Web Console link and log using |
Interacting with the Greeting Service
As we have seen above, the Greeting API exposes two Rest endpoints. In this section we are going to see how to create and display a greeting message.
Creating a Greeting Message
With the following command, we will create a greeting message with the id quarkus.
curl -X POST http://localhost:8080/greeting/quarkus -H "Content-Type: application/json" -d '{"name" : "Infinispan Client", "message":"Hello World, Infinispan is up!"}'The service should respond with a Greeting added! message.
Displaying a Greeting Message
With the following command, we will display the greeting message with the id quarkus.
curl http://localhost:8080/greeting/quarkusThe service should respond with the following json content.
{
"name" : "Infinispan Client",
"message" : "Hello World, Infinispan is up!"
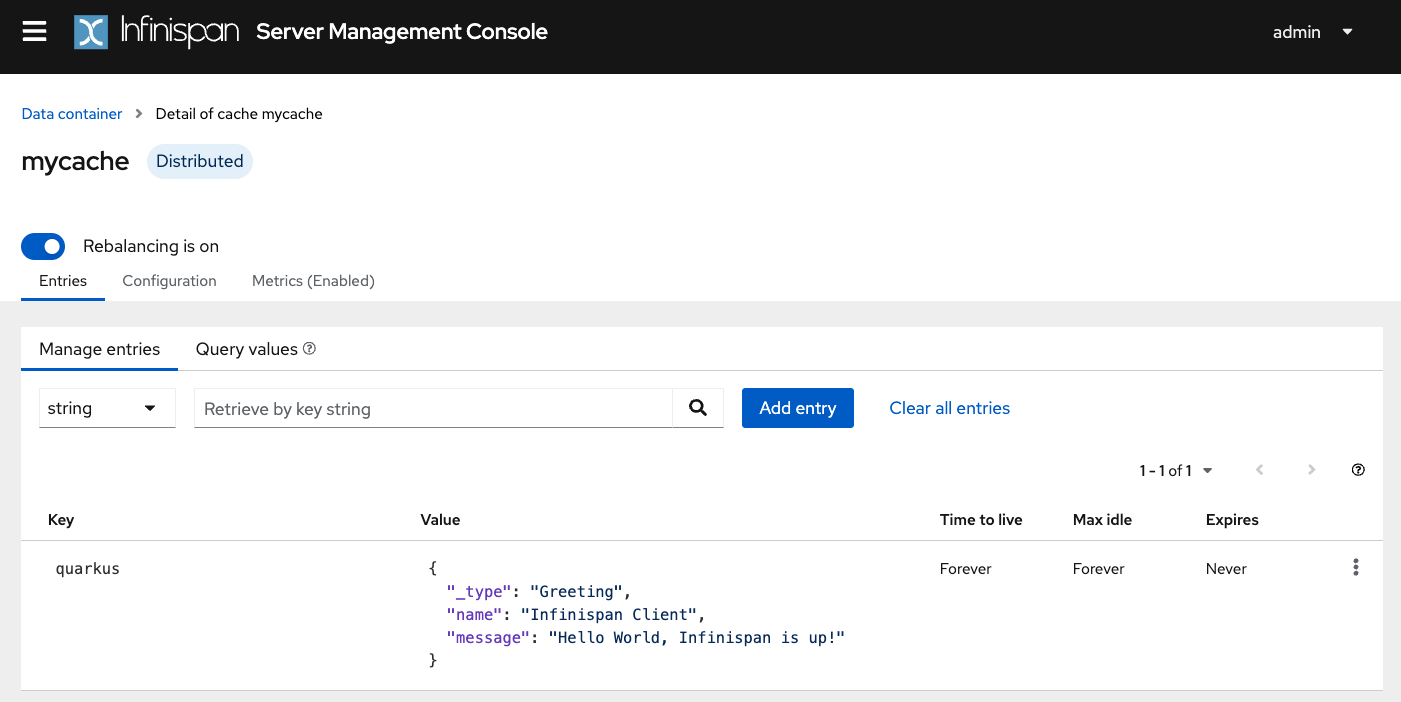
}Display the cache and content with the Infinispan Server Console
If a requested cache does not exist, Quarkus creates a cache with a Default configuration on first access. We should be able to reaload the Infinispan Server Console and display the content of the Cache. The Infinispan Server Console uses the Infinispan Server REST API. The content can be displayed in JSON thanks to the Protobuf Encoding that converts to JSON format.
Configuração para produção
At this point, Quarkus uses the Infinispan Dev Service to run an Infinispan server and configure the application. However, in production, you will run your own Infinispan (or Red Hat Data Grid).
Let’s start an Infinispan server on the port 11222 using:
docker run -it -p 11222:11222 -e USER="admin" -e PASS="password" quay.io/infinispan/server:latestEm seguida, abra o arquivo src/main/resources/application.properties e adicione:
%prod.quarkus.infinispan-client.hosts=localhost:11222 (1)
%prod.quarkus.infinispan-client.username=admin (2)
%prod.quarkus.infinispan-client.password=password (3)| 1 | Sets Infinispan Server address list, separated with semicolons |
| 2 | Sets the authentication username |
| 3 | Sets the authentication password |
Empacotando e execução no modo JVM
Você pode executar a aplicação como um arquivo jar convencional.
Em primeiro lugar, temos que empacotar a aplicação:
quarkus build./mvnw install./gradlew build| This command will start an Infinispan instance to execute the tests. |
Em seguida, execute:
java -jar target/quarkus-app/quarkus-run.jarExecutando em modo nativo
Você também pode criar um executável nativo a partir dessa aplicação sem fazer nenhuma alteração no código-fonte. Um executável nativo elimina a dependência do JVM: tudo o que é necessário para executar o aplicativo na plataforma de destino está incluído no executável, permitindo que o aplicativo seja executado com o mínimo de sobrecarga de recursos.
A compilação de um executável nativo demora um pouco mais, pois o GraalVM executa etapas adicionais para remover caminhos de código desnecessários. Use o perfil native para compilar um executável nativo:
quarkus build --native./mvnw install -Dnative./gradlew build -Dquarkus.native.enabled=trueQuando a compilação estiver concluída, pode rodar o executável com:
./target/infinispan-client-quickstart-1.0.0-SNAPSHOT-runnerIndo mais longe
To learn more about the Quarkus Infinispan extension, check the Infinispan Client extension reference guide.