Riding Camel Quarkus: effortless APIs

Discover Camel, the swiss-knife of integration brought to Quarkus. The example encourages API best practices, with effortless coding effort showcasing AtlasMap for data transformation.
Introdução
Quarkus offers an extensive collection of extensions to connect to web, data and messaging systems, providing the developer fantastic functionality at his disposal. However, in many cases, the problem at hand already belongs to one (or more) of the well-known enterprise integration patterns.
Developers often kickstart their projects unaware that Apache Camel has perfected how to best address integration patterns. Camel Quarkus provides hundreds of connectors and rich functionality for data mediation: data formats, transformers, templating, custom processors, etc.
Camel Quarkus is a subproject in the Apache Camel community that enables Camel to run on Quarkus. Apache Camel, often called the swiss-knife of integration, is the most popular open source community project aimed at solving all things integration.
An OpenAPI example
Let’s pick a helpful example that highlights the benefits of using Camel Quarkus in contrast with other development approaches. Implementing and evolving API services sounds like a use case almost every reader can relate to. We’ll use the broadly adopted OpenApi specification.
Of course, the example illustrated in this article plays in the context of integration, where you’re enabling access or integrating source systems, performing data processing of some sort, and connecting and sending data to back endpoints.
By all means, Camel Quarkus is not a “one to rule them all” solution. It will not be a good fit if your scenario deviates from the above context, for instance, a data access layer with heavy datastore interaction, a web server, a media application, etc.
We find many Quarkus (non-Quarkus too) examples showing how to define and implement APIs. They all try to be as helpful as possible and propose the way forward. I realise this article is no different. However, I’m certain Camel Quarkus brings an elegant and effortless approach worth considering.
Code-first vs Contract-first
Although these are two different strategies to implement APIs, with their pros and cons, we are sticking to the contract-first approach, that is, when the API specification (the contract) is provided before the code implementation begins.
In our example, the development team does not own the API. Their task is to implement the services to expose and comply with the given API specification. A different team in the organisation is responsible for designing, releasing, and delivering API governance. The picture below illustrates a contract-first approach.
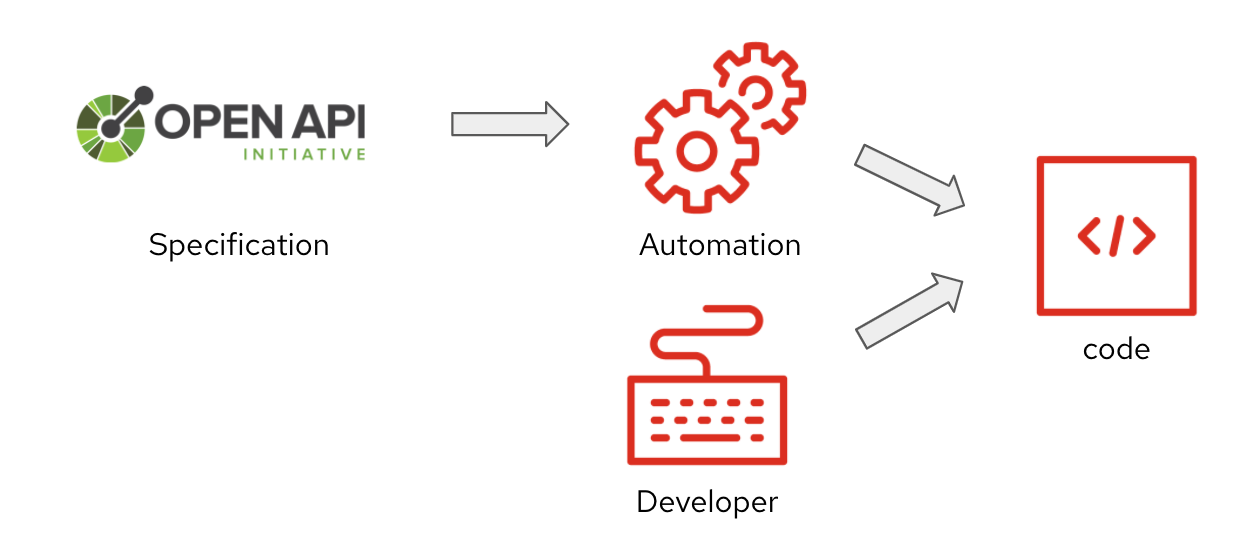
A code-first strategy implies the API specification derives from the implemented code. You can use libraries to auto-generate the specification based on the code the developer has crafted. Code-first would be more appropriate for fast prototyping or simply when you have complete control over the API with a very open, relaxed and flexible approach to your development with little or no impact on others.

Basics about Camel and REST
Here’s a speedy summary for those unfamiliar with Camel and how to implement REST APIs.
Camel has its domain-specific language (DSL) to define processing flows, known as the Camel DSL. You use Camel components (aka. connectors) in the DSL to move data from sources to targets. Camel Quarkus has 300+ available extensions.
Camel provides an additional domain-specific language for specific REST implementations: the REST DSL. When implementing REST services with Camel, you chain both DSLs to define the service’s end-to-end behaviour.
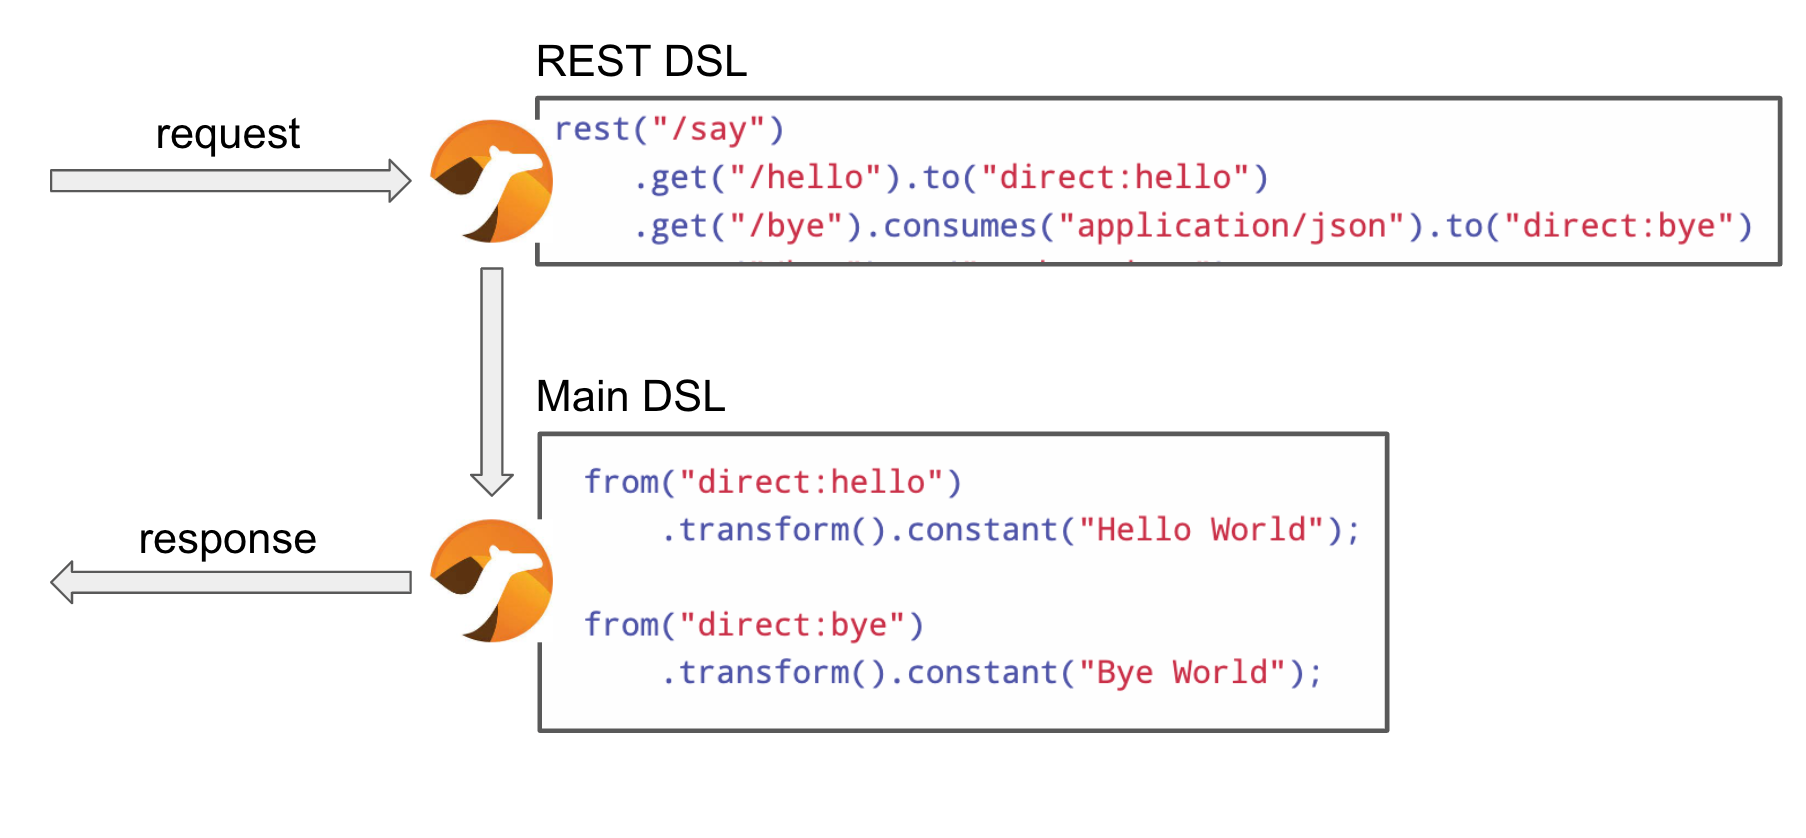
Camel forwards incoming REST requests from the REST DSL to the main DSL via the Camel ‘direct’ component, which is essentially a connector used for internal invocations, as if calling a Java method from a line of Java code.
Easy ride preparations
The ultimate goal is to relieve the developer from dealing with API related preparations and configurations and allow him to concentrate on the business logic.
To be more specific, in the previous diagram, the REST DSL comes handy when developers adopt a code-first approach. However, its definition feels redundant in a contract-first world since the provided OpenAPI specification already defines all the API details.
Camel allows you to auto-generate the REST DSL out of an OpenAPI specification. This automation simplifies the work by letting the developer just focus on the processing flow implementation.
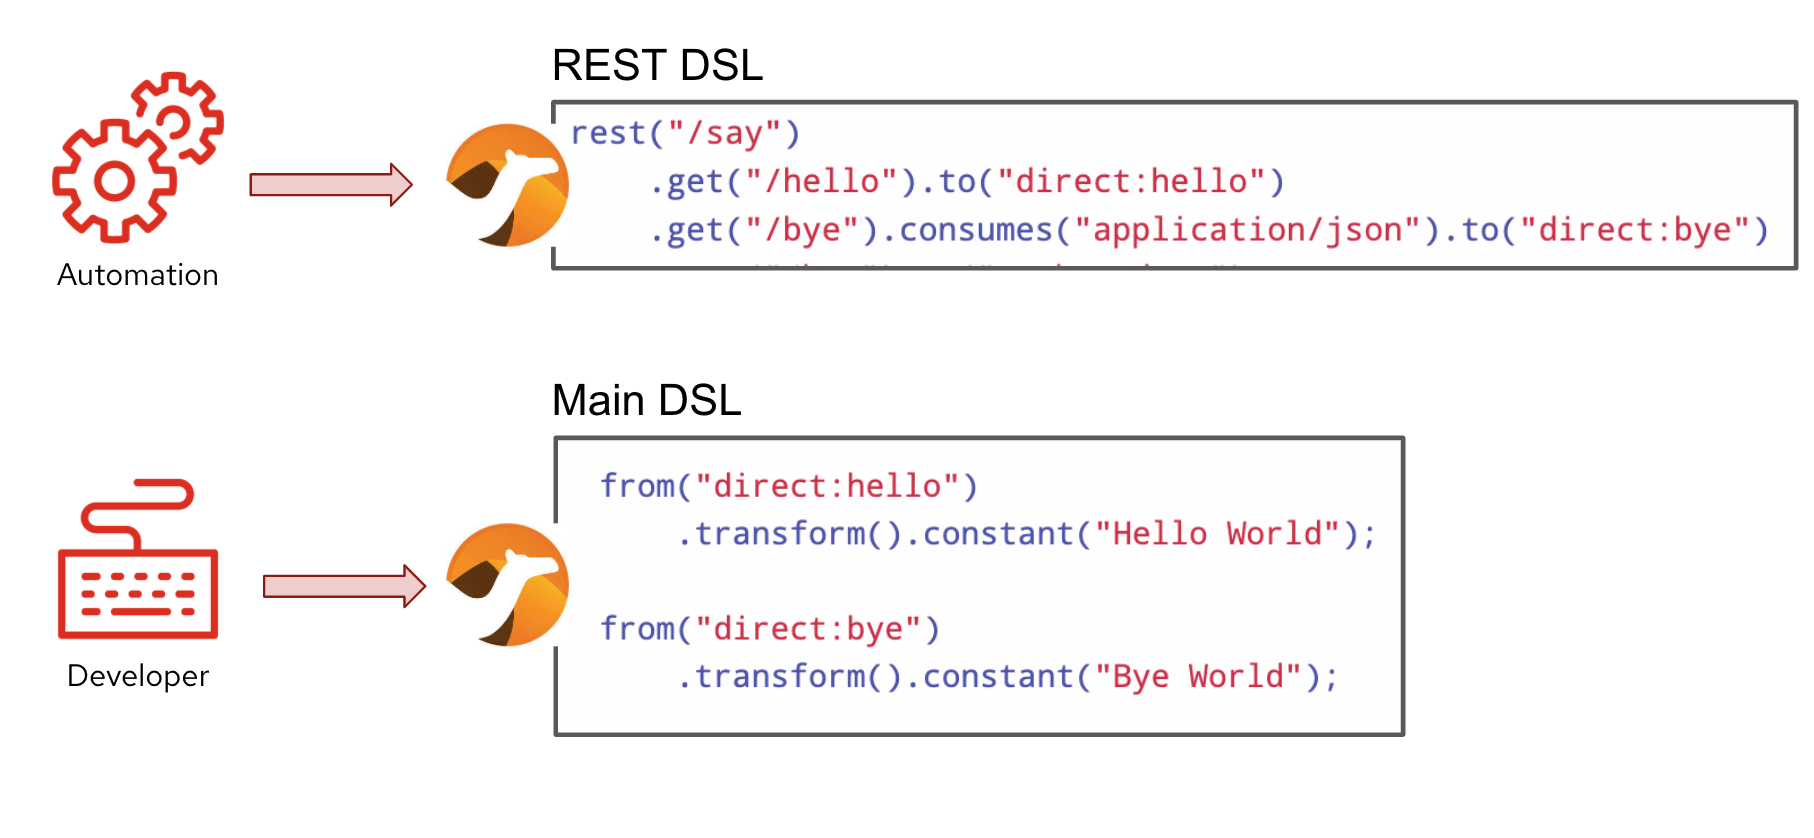
The automated code generation shown above is enabled via the configuration of the following Maven plugin:
<plugin>
    <groupId>org.apache.camel</groupId>
    <artifactId>camel-restdsl-openapi-plugin</artifactId>
    <executions>
        <execution>
            <id>simple</id>
            <goals>
                <goal>generate-xml</goal>
            </goals>
            <configuration>
                <specificationUri>src/main/resources/META-INF/openapi.json</specificationUri>
                <restConfiguration>false</restConfiguration>
                <outputDirectory>${project.build.directory}/classes/routes</outputDirectory>
            </configuration>
        </execution>
    </executions>
</plugin>
Notice the <outputDirectory> parameter set to a destination inside the target directory. The setting allows Quarkus to load the Camel REST resource at start-up time and prevents the source directory from being polluted with unnecessary code.
Also, you’ll observe we’re picking the OpenApi specification from the project’s source directory. The best practice would be to fetch, via another Maven plugin, the OpenAPI from a remote Service Registry representing the source of truth.
|
The OpenApi definition used in our example has been created with Apicurio Studio, a beautiful and intuitive design time visual tool. |
Let’s pretend we do fetch the OpenApi definition from a remote server. Under that assumption, the diagram below shows how the project is kept simple and clean. Maven injects both the OpenApi and REST definition into the target directory at compilation time. When packaging the solution, it includes all necessary artefacts to run.
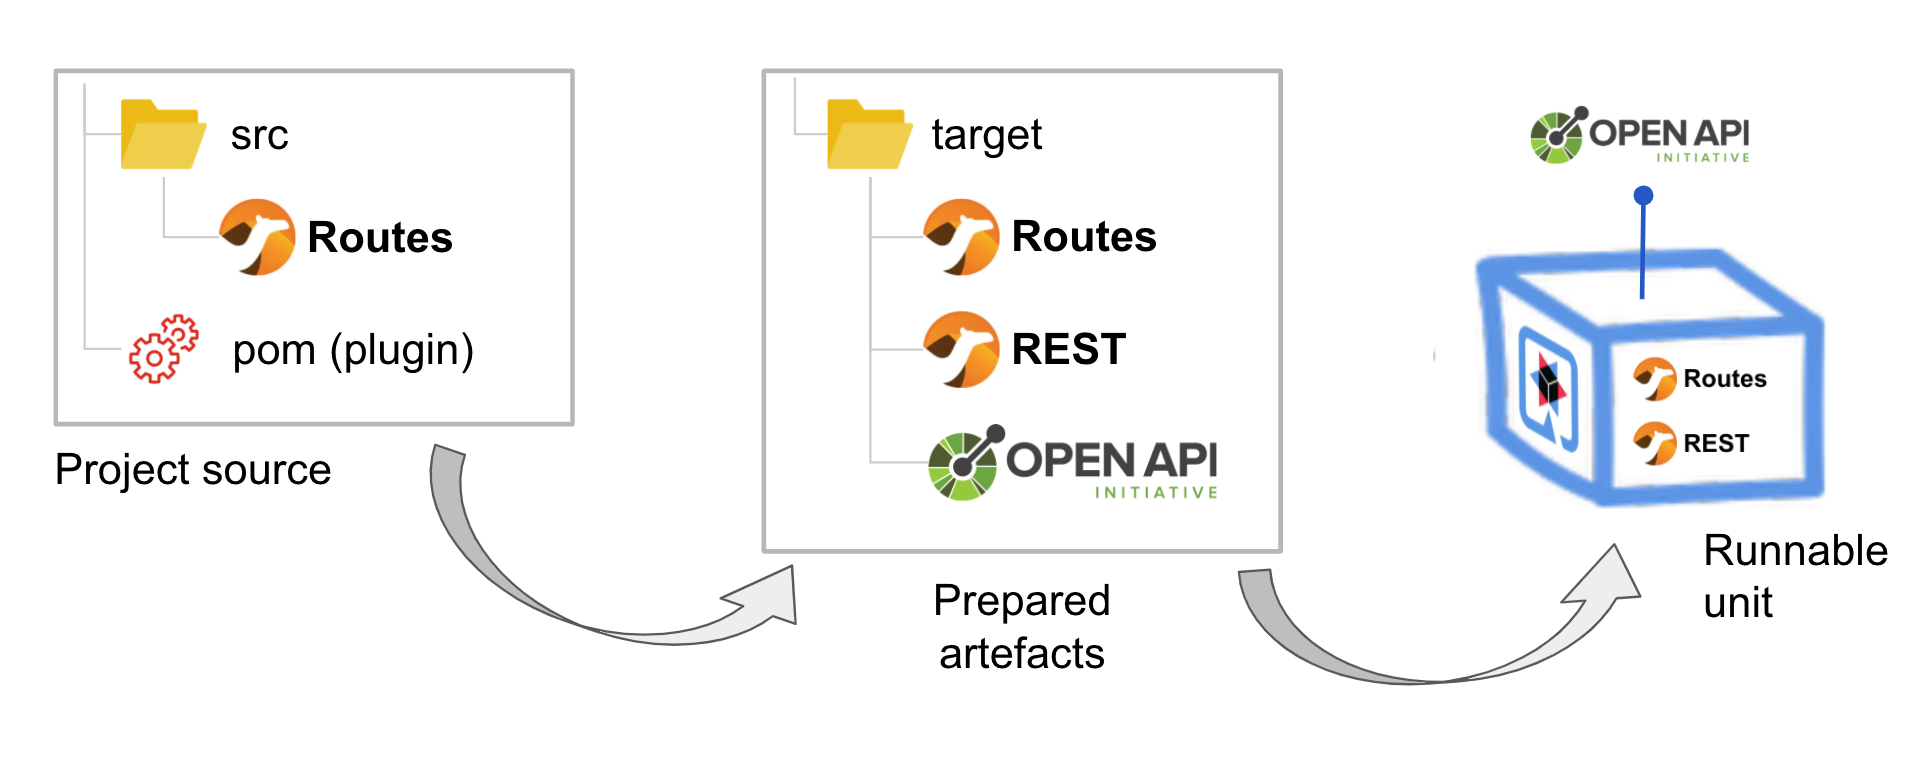
|
The best practice is to fetch the OpenAPI specification from a remote Service Registry (the source of truth). For simplicity, our project already includes the specification. |
Application version 1.0
Let’s look at our chosen (example) API service and see how to drive its implementation in its first iteration. The API Design team has released an OpenApi specification v1.0 for a service called ‘Individual’, and we, the developers, need to implement the service in compliance with its definition.
This first version of the service has a single operation to retrieve the details of an individual. By setting up our project to parse and auto-generate the REST DSL as described in the previous section, we just need to implement a single Camel Route to process incoming service calls, as illustrated below:

We’ll keep the use case relatively thin; our focus stays at “Easy APIs with Camel Quarkus”. But still, we want the scenario to be within an integration context to showcase some Camel Quarkus capabilities.
Our Camel route connects with a legacy backend that enables access to ‘individual’ data. The processing logic requires adapting the incoming OpenApi call to the legacy backend system’s interface. This data adaptation requires data transformation both during the request and response flows.
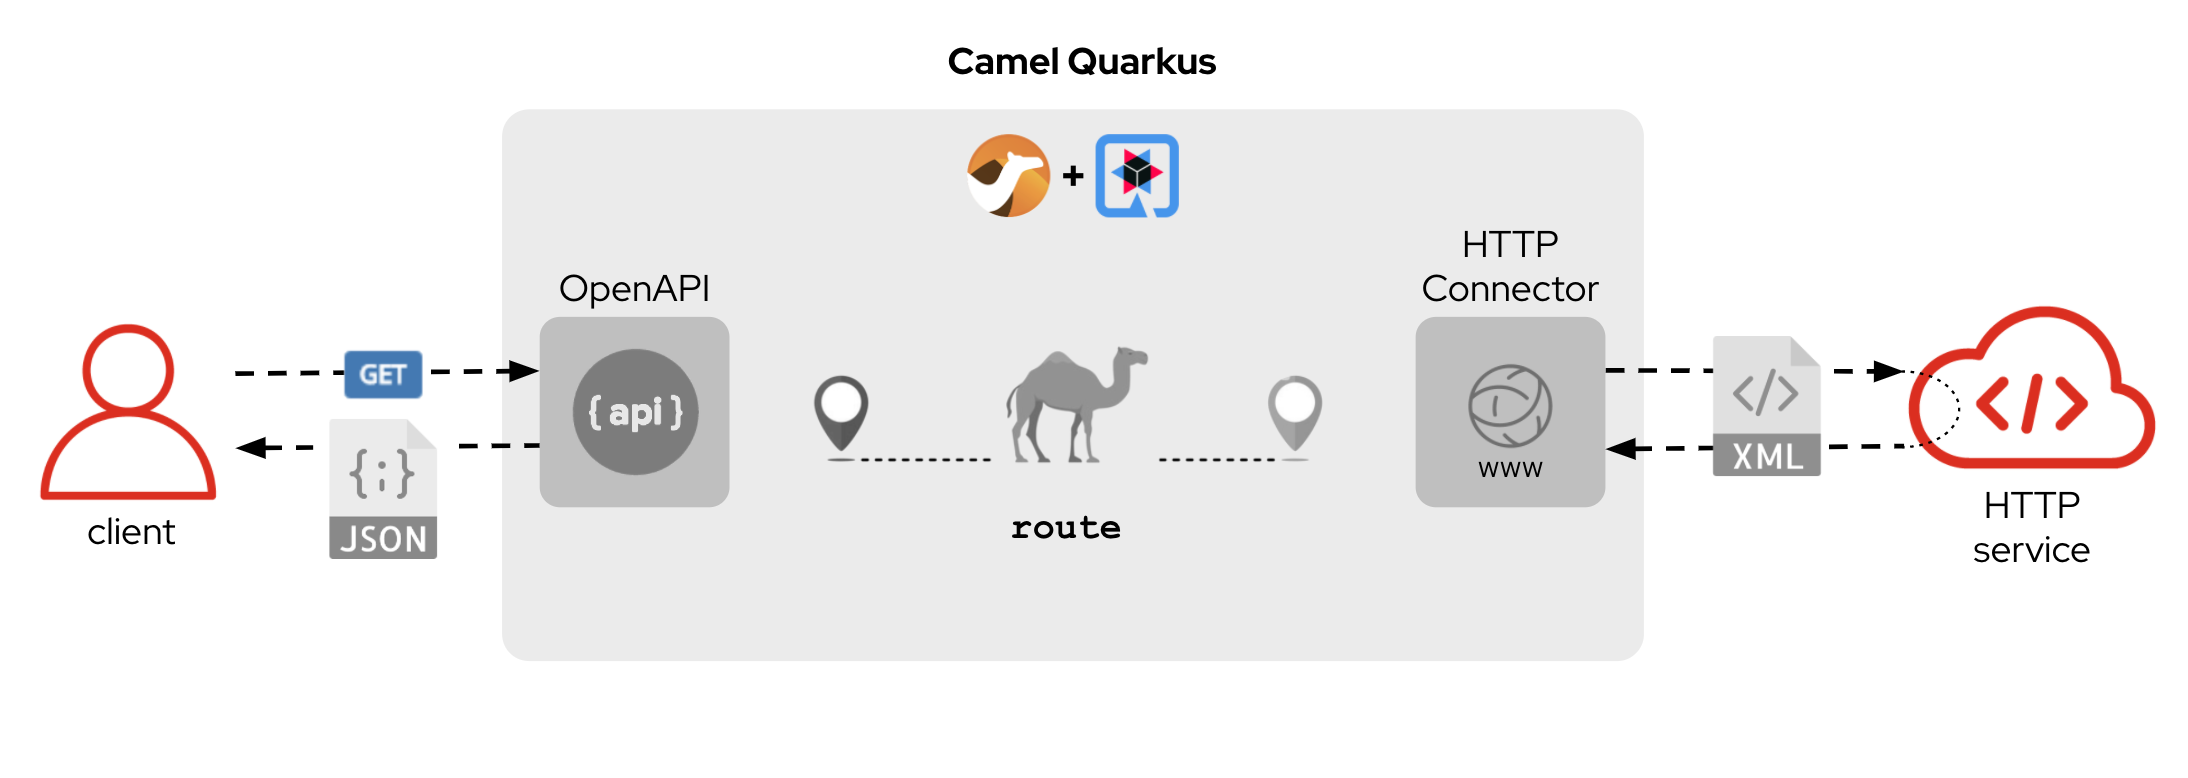
In a classic development approach, the developer needs to incorporate a Java data model to operate and handle incoming and outgoing data, for example, by defining Java classes and data structures to represent the data the service needs to manipulate.
In our example, the OpenApi contract already predefined the data model describing the inputs and outputs of each operation. Likewise, the backend also defines a contract (or interface) to comply with when triggering calls.
With Apache Camel, we can keep the implementation very clean by using Camel functionality dedicated explicitly to data transformation. In our example, we’ll use the AtlasMap component for various reasons:
- It provides intuitive visual tooling to map source data to target data
- It performs structural and data transformation (JSON ⇄ XML) in a single action
- It does not require predefined Java data models
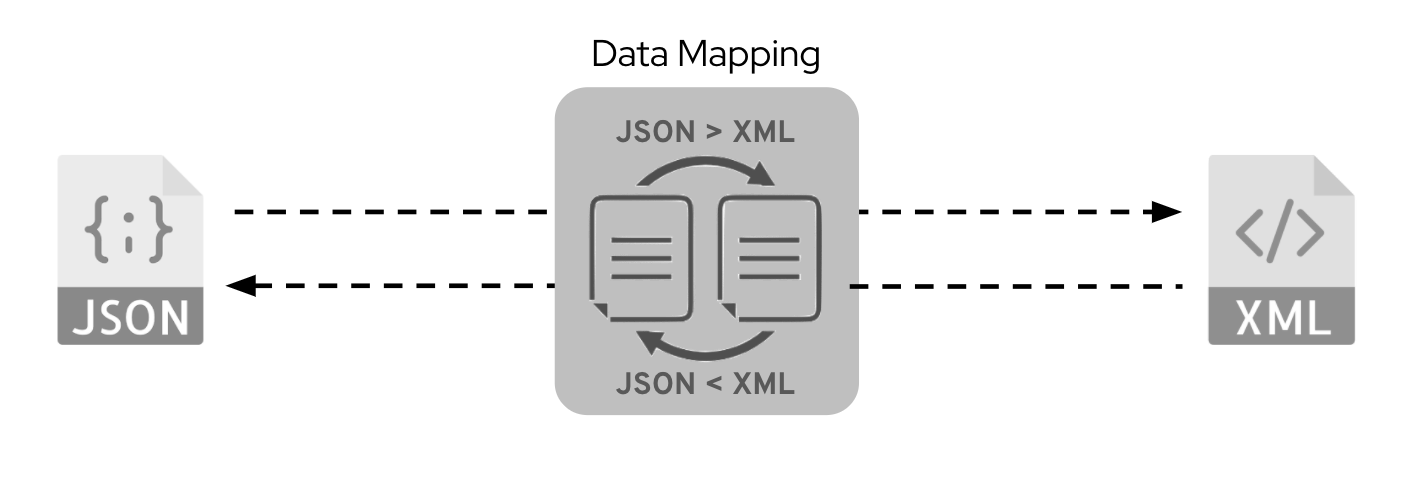
Let’s start looking at the route definition the developer needs to produce and how Camel links the OpenAPI operation to its code implementation:

operationId as a link to invoke the Camel route.Camel Quarkus uses the operationId from the OpenAPI specification to trigger an internal call (using the direct component) and expects a Camel consumer (from tag) with a matching operationId value to process the client request.
The Camel route couldn’t be simpler:
from("direct:getDetails")
.to("atlasmap:map/request.adm")
.to("direct:call-backend")
.to("atlasmap:map/response.adm");- The first line declares the route (and matches the `+operationId+`).
- The second line applies a data adaptation (or mapping) to prepare the back-end call's payload.
- The third line invokes a Camel route that calls the backend and collects the response.
- The fourth line maps the response XML into JSON data in compliance with the OpenApi definition.
You can easily create the data mapping definitions using AtlasMap’s VSCode extension. When editing the Camel route in VSCode, you’ll find a contextual and actionable hint you can click (over the ‘atlasmap’ code line) that launches the AtlasMap editor with the data mapping definition loaded.

|
The following blog in the Apache Camel community describes how to use the tooling. |
The picture below shows the data mapping definition in AtlasMap for the request flow:

The property id (left) represents the {id} path parameter from the HTTP URL. It maps to the target XML data structure, connected to the id node (right). You define mappings with drag and drop actions from left to the right.
Following the data transformation action, the flow invokes the backend. The snippet below shows the developer’s Camel route definition to trigger the HTTP request.
from("direct:call-backend")
.removeHeaders("*")
.setHeader(Exchange.HTTP_METHOD,  constant("POST"))
.setHeader(Exchange.CONTENT_TYPE, constant("application/xml"))
.to("http:{{api.backend1.host}}/camel/individual/details");
The two main actions in this route are:
- Set headers (ensuring we clean up incoming ones)
- Trigger the call using Camel’s HTTP component.
The expected XML interaction with the legacy backend system is as follows:
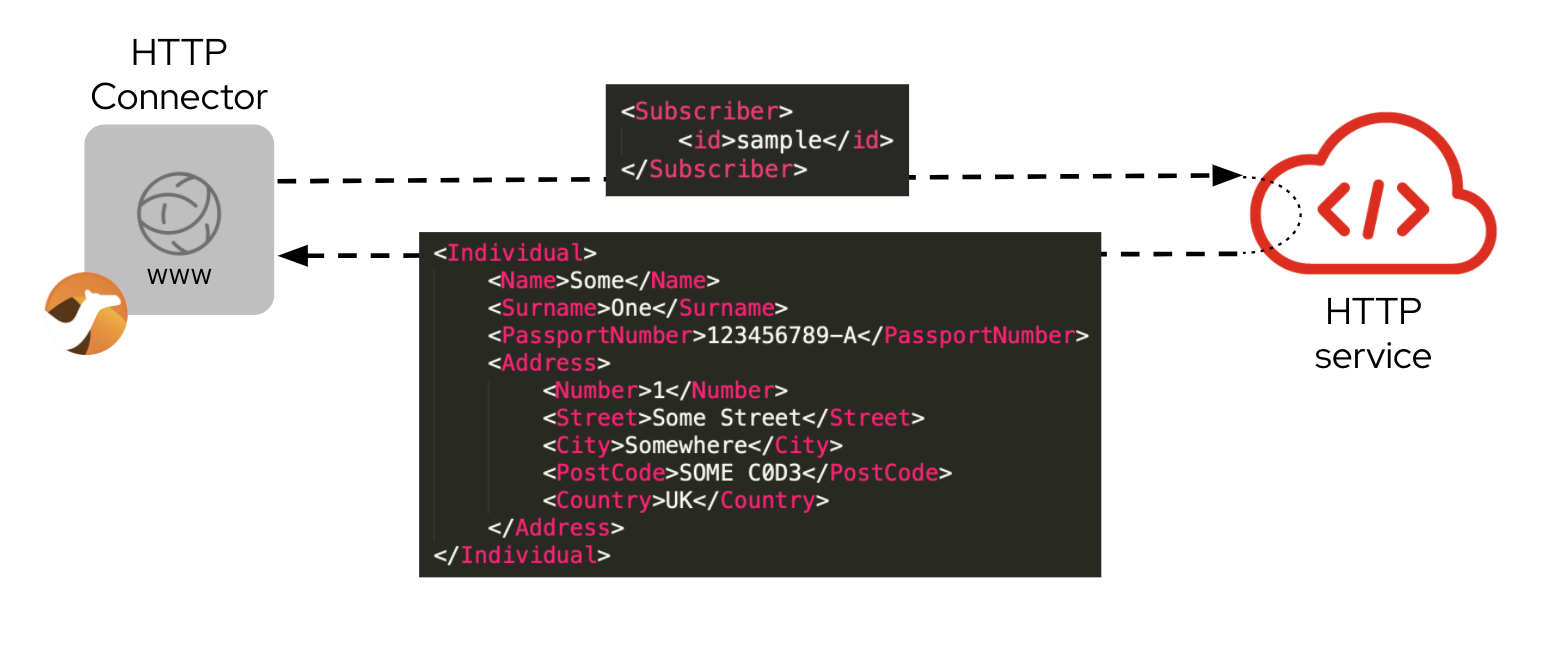
The response data mapping definition would be defined in AtlasMap as shown below:
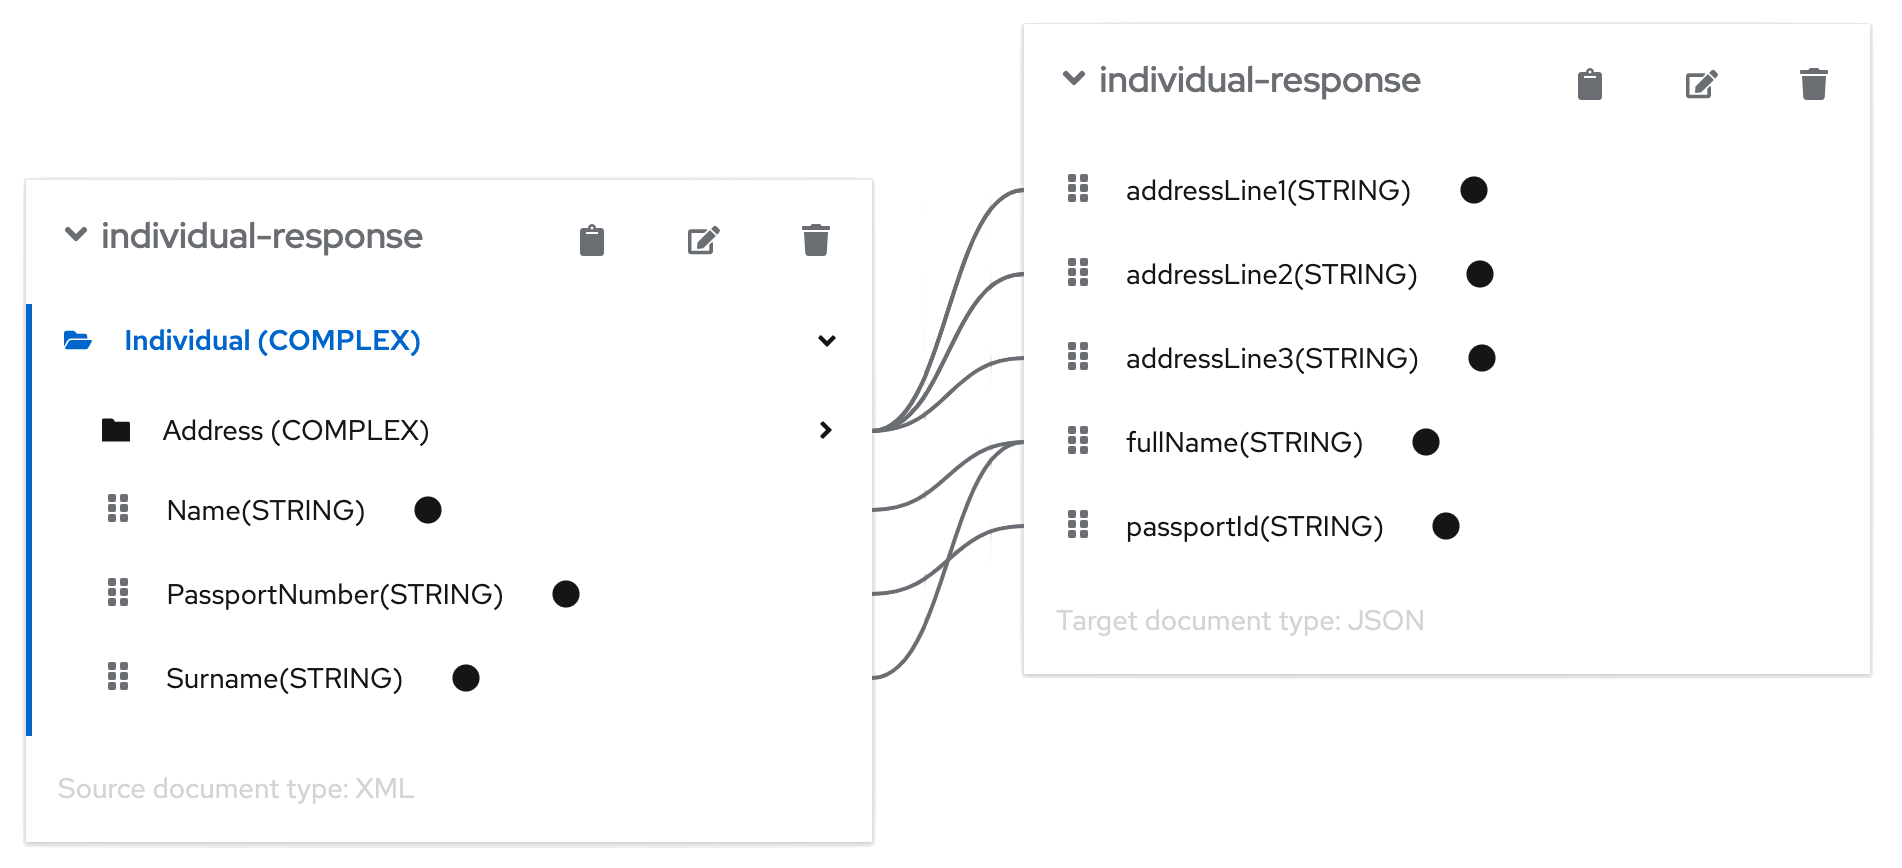
The data structure on the left represents the source XML to map (backend response), and the data structure on the right represents the target JSON data to compose and send back to the client.
Summary
Let’s review the implementation effort the developer needs to undergo in this first iteration of the Individual API:
- Setup the project (include dependencies, plugins, etc.)
- Define the Camel routes:
- The main Camel route
(4 lines of code) - The backend invocation route
(5 lines of code) - Define the data transformations:
- Request mapping
- Response mapping
That’s looks neat to me.
Application version 2.0
The real benefit of this development approach, and its simplicity using Camel Quarkus, becomes more evident when the DEV team receives a new version 2.0 of the Individual API, released by the Design team, with a new operation to be implemented.
Version 1.0 was only intended for internal consumption. Now there is a demand to expose the service externally, which requires introducing a level of data protection to ensure the customer’s data is kept confidential.
Version 2.0 defines a new operation the developer needs to implement. Hopefully, the impact on the current code will not be too significant.
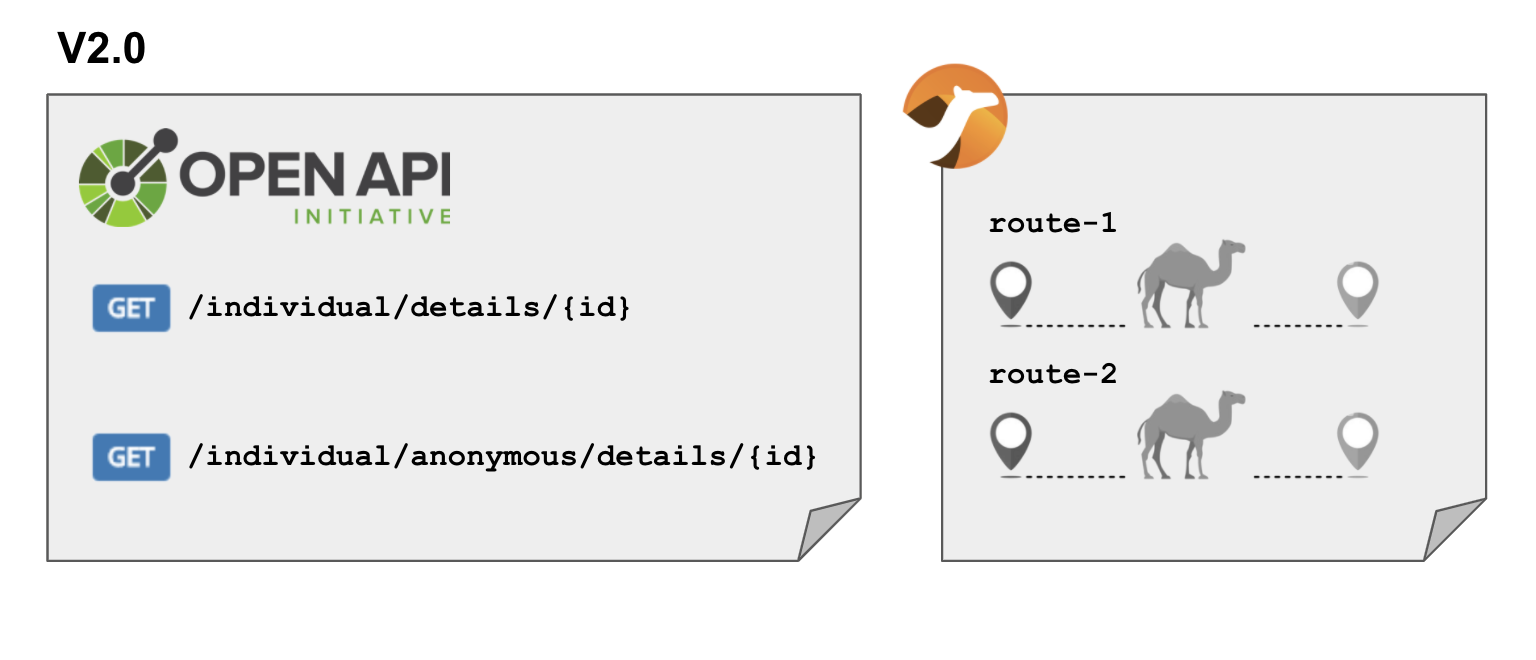
The main goal of the new operation is to anonymise sensitive data in the JSON response payload to send back. Other than that, the same logic applies, we prepare and invoke the backend in the same manner to obtain the individual data.
In version 1.0, we saw the routes implemented using the Java DSL. In version 2.0, we will use the XML DSL.
|
The use of one DSL over the other is more of a user preference. The XML DSL helps in keeping Camel routes definitions well organised. In contrast, the Java DSL is placed inside Java classes, at times challenging to locate, along with other regular Java code. Your code can get a bit messy and disorganised. Also, the Java DSL doesn’t enjoy the support of graphical tooling, while XML and YAML are DSLs that allow visual helpers. |
Let’s look at the new Camel route definition the developer has coded in XML:
<route>
    <from uri="direct:getAnonymousDetails"/>
    <to uri="atlasmap:map/request.adm"/>
    <to uri="direct:call-backend"/>
    <to uri="atlasmap:map/response-anonymous.adm"/>
</route>
The new route is almost identical to the first one. You will observe only two differences:
- The
‘direct’component matches the new‘operationId’in version 2.0 - The response data mapping is new
The data mapping definition from 2) looks as follows in the AtlasMap editor:
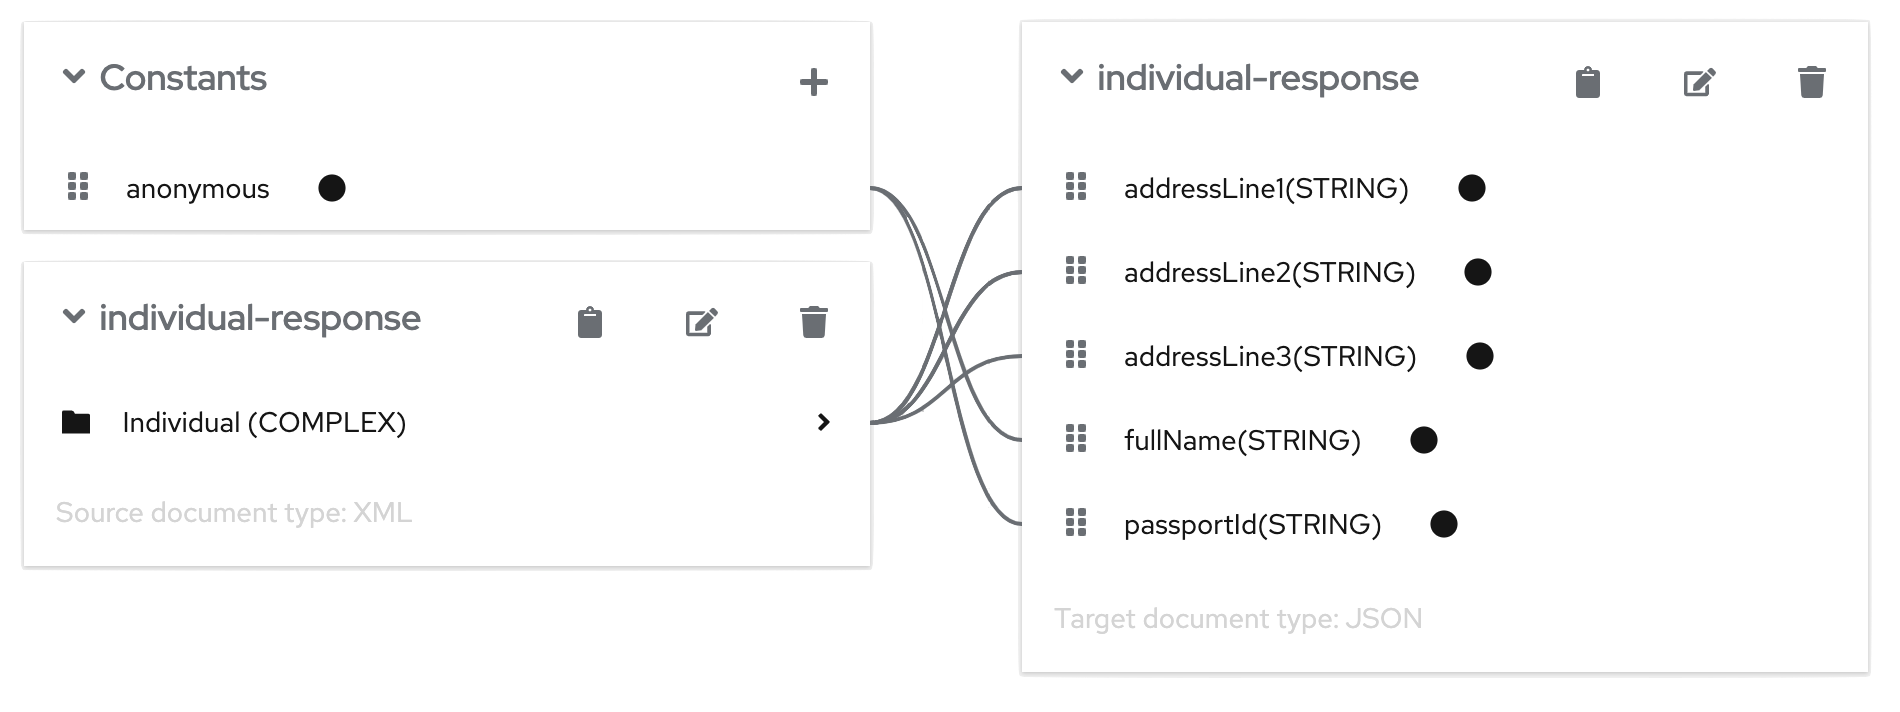
The main highlight from above is the definition of an ‘anonymous’ constant that maps to the ‘fullName’ and ‘passportId’ target fields:
Name: anonymousValue: *********
The new Camel route and the new mapping definition completes the implementation of the new operation in v2.0. At this stage, the developer is sweating from the enormous effort and the long hours it took to deliver the new version.
Summary
Let’s quickly review the actions required to complete the second iteration of the service:
- Replace the OpenApi v1.0 with the new specification v2.0
- Create the new Camel route
(1-line if you copy/paste) - Create the new data mapping
(2 drag and drop actions if you copy/paste)
Again, not bad at all. The effort was truly minimal.
Trying out the operations
To discover and explore services in code-first developments, you need to ensure the project auto-generates the specification from the implemented code.
In our case (contract-first) the specification is already provided. We can easily expose it and embed a Swagger-UI client using the Smallrye OpenApi extension that Quarkus provides. Ensure your POM file includes the following dependency:
<dependency>
    <groupId>io.quarkus</groupId>
    <artifactId>quarkus-smallrye-openapi</artifactId>
</dependency>
For more detailed information on how to expose OpenApi definitions, you can read the following section in the Quarkus documentation. There are different settings we can configure to our liking. We’ve configured some of them. If you feel curious, we encourage you to look at the source code provided with the article.
We can compile and run our application locally with the following command:
./mvnw clean quarkus:dev|
Remember, our Camel integration invokes a legacy backend. We’ve provided one included in the GitHub project. Ensure you read and follow the ‘Readme.md’ instructions to prepare the stub (legacy backend). |
Once the application is up and running, open a browser and discover the service by entering the following URL on your address bar:
http://localhost:8080/camel/openapi.json
Click and try out the v1.0 operation:

Enter a dummy value for the {id} parameter, for example, ‘123’. If your legacy system (stub) is up and running, you should obtain the following response:
{
  "passportId": "123456789-A",
  "fullName": "Some One",
  "addressLine1": "1 Some Street",
  "addressLine2": "Somewhere SOME C0D3",
  "addressLine3": "UK"
}
Now, give a go to our v.2.0 operation:

You should obtain the following response:
{
  "addressLine1": "1 Some Street",
  "addressLine2": "Somewhere SOME C0D3",
  "addressLine3": "UK",
  "passportId": "**********",
  "fullName": "**********"
}
You will observe some of the fields now anonymised as per the mapping settings in AtlasMap.
Last words
This article shows you how choosing Camel Quarkus, and a contract-first implementation approach provides great simplicity and low maintenance cost. It allows rapid functionality growth.
When your processes move data from sources to targets, use Camel Quarkus, probably the best fit for the job when building integration services.
Resources:
Here is a list of related resources you may be interested to explore:
-
Github project where the blog’s source code lives.
-
Article covering Camel Quarkus and Camel K, also based in Quarkus.
-
Camel Quarkus home page in Apache Camel.
-
AtlasMap home page, the visual data mapping tool that accelerates your implementation.
-
Apicurio home page, the Design time tool to create your OpenAPI contracts.
